Showing posts with label how. Show all posts
Showing posts with label how. Show all posts
Friday, May 8, 2015
How To Rotate An Object in Inkscape Free Rotate Specific Degrees and 90 Degree Increments
Free Rotate An Object.png) Select the Object that you wish to Rotate. Select the Object that you wish to Rotate.  8 Black Arrows will appear around the Object when it is selected. These are Resizing Handles. 8 Black Arrows will appear around the Object when it is selected. These are Resizing Handles.Clicking on the Object again will change the Resizing Handles to Rotation and Skew Arrows. The Rotation Arrows are at the 4 Corners of the Object. Move the cursor over any one of them, hold the mouse button down, and turn the mouse in a Clockwise or Counter-clockwise direction to Free Rotate. Rotate Object To A Specified Degree | |
  Go to the Menu Bar and select Object > Transform. 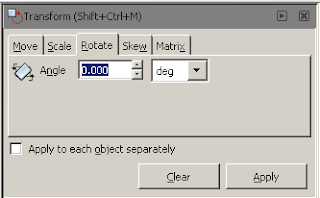 This will open the Transform Window which has 5 Tabs, namely Move, Scale, Rotate, Skew, and Matrix. Select the Rotate Tab. Where you see Angle, you will type in the Degrees you would like the Object to be Rotated. Keep in mind that to Rotate the Object Clockwise, you will have to enter a Negative Number (e.g. -30). To Rotate the Object Counter-clockwise you will have to enter a Positive Number (e.g. 30). Click on the Apply Button when finished. | |
Rotate Object in 90 Degree Increments Select the Object you wish to Rotate. Select the Object you wish to Rotate. Go to the Menu Bar and select Object > Rotate 90 Deg CW. This will move your Object forward in a Clockwise Direction at 90 Degree Increments each time you use it.      To Rotate in a Counter-clockwise Direction go to Object > Rotate 90 Deg CCW. To Rotate in a Counter-clockwise Direction go to Object > Rotate 90 Deg CCW. This will move your Object backward in a Counter-clockwise Direction at 90 Degree Increments each time you use it. |

Monday, February 16, 2015
Turbo C for Windows XP How to Download and Install
Hello friends, after enjoying the festival of diwali I am back again to write something for you. Many visitors asked me that from where they can download turbo c++ for windows xp. So i thought that i should do something to help them. In this post i am giving you the link to download the compiler and step by step guide to install it.
- Click Here to Download Turbo C++ for Windows XP -
Also Read: Download Turbo C++ for Windows 8 for Free
Also Read: Download Borland C++ Compiler For Free
Also Read: Download Borland C++ Compiler For Free
How to Install Turbo C++ for Windows Xp
1. First of all download the compiler from the link given above.
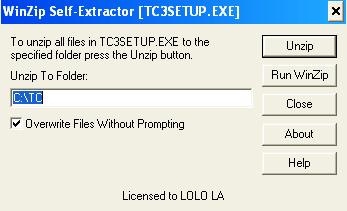
2. Now extract the zip file and than open TC3SETUP.
3. After that click on Unzip. You can also change the path where you want to install it.
4. By default it is installed in C:TC.
5. You have done!! Please share and like it.
How To Hack Facebook Account With Keyloggers
 |
| How To Hack Facebook With Keyloggers |
This tool is extremely easy to connect and use. All you have to do is give an email address and a password where the stolen information is to deliver. Can’t be easier than that.Just type in the email address and password and then click on the build button. A new “SERVER.EXE” file will be created and most of the work is already done. Now the big part comes. Just send this file to the victim. Rename it, change the icon and make it more presentable so that the victim opens it for sure.As soon as the victim opens the file, Server.exe will get all the passwords saved and facebook account credentials and will give them to you. To avoid detection, the facebook Hacker will also look for all the processes related to a security suite and kill them upon detection. The most important thing this software does is it kills all the security suite detecting it.
Wednesday, February 11, 2015
How to Speed Up the Page Load Time in Blogger
For any website only the loading time expresses its accessibility and usability. Among all the site structure, design algorithm, and its updates that are constantly changing, speed always plays a very major role and an essential component of a website for a better ranking. It would really bore if you need to wait for a 10 to 20 seconds for every single post to load.

Do you know the increase of load time could affect your blog and could increase your blog bounce rate? Yes, this could sometimes result in loss of traffic as well as search ranking! That is the reason why you need to improve the site’s load time.
First of all let me tell you how to check the site loading time. Using tools like Google Page Speed Test or Pingdom Tools can provide you the information about the loading speed on Mobile as well as Desktop platforms.
There are so many factors that could affect your load time and speed, here some easy efforts consider for blogger’s success!
Choosing the Right Template Design
Templates or themes play a huge role in the main structure of a blog. Make sure that you choose the right theme that is simple as well as does not ruin your speed. Remember, no one will like a blog that takes so much of time to load. So it is very essential to choose the template that has good structure and coding in order to support the loading speed.
Also Read: How to Choose the Right Theme for Your Blog?
Minifying JavaScript & CSS Files
Too many JavaScript code or CSS styles can take too much of time for a website to load. When you find it affects your user experience, then minify the JavaScript and CSS that removes all the Js and css files from the source page and add it on a single Js file and single CSS file. If it would be possible to include it on one, then it can greatly help you web page load quickly. To remove unnecessary codes from the template, navigate to Blogger Dashboard > Template > Edit HTML and try to search unnecessary coding to remove it.
Limiting the Number of Home Page Posts
Higher the number of posts higher will be the load time! Try to avoid setting too many posts on home page because it is the first thing which people see once they visit your blog. To do this, you can navigate to Blogger Dashboard > Setting > Post and Comment – Under the post field, enter the number of posts that you would want to display on home page!
Compressing and Optimizing Images
Images are a very crucial component that gives a visual treat to the users. At the same time, if you don’t use it properly, it could take a large amount of bandwidth. However, when you reduce image size, make accurate image widths, and choose fewer amounts of images on every page, it can easily reduce your loading time. Many a time, the size of “.jpg” file size will be lesser than that of “.png” depending on the photo editing software. But PNG is known for its transparency! So make sure to place the right format at the right place.
Also Read: Top 12 Best Logo Design Tools To Create Unique Logo Designs
Avoiding Ads (Iframe, JavaScript)
Advertisement like Google Adsense, Yahoo uses JavaScript and Iframe that also adds on loading time of your blog. Sometimes even if the header part is not loaded properly, then the rest of the page will stop getting displayed. This might cost you more than what you have earned! So be careful while using Ads. If it is mandatory to use Ads, then make sure to have a one or two not more than that!
Visitors of your website are more sensitive towards the look and feel! Even a small negative factor could affect you badly. As a blogger it is your responsibility to keep visitors engaging while staying happy. So keep in mind, retaining the visitor is highly possible with site’s load time!!
For more help about loading speed of a website, check out Google’s help forum: https://support.google.com/blogger/answer/42394?hl=en
Author Bio:
Amy Jasmine is a blogger addict who loves to share informative ideas on major blogs. She works for Chennai Webs Web Development Company and spends her free time on reading books.
Thursday, February 5, 2015
Flash Sound Tutorial How to Add Sound to Flash Movies Importing Audio Files into a Flash Documents Library
In this beginners Flash sound tutorial, were going to talk about the basics of how to add sound in Flash. Adding sound to your Flash projects can make them a little more interesting. You can use audio files to add voice over narrations, background music and sound effects, for example. One way of being able to work with sound using Flash is by importing the sound files into your Flash document. Some of the audio formats that Flash gives you the ability to import include, but are not limited to:
In the next article, were going to learn how to add imported audio files to a Flash documents timeline. That article is also going to talk about the difference between the Flash Event Sound and the Flash Stream Sound options - two options for synchronizing sound in Flash.
NEXT: Adding Sound to Flash Movie Timeline and Choosing Flash Sync Sound Options - Flash Event Sound vs Flash Stream Sound
Read more »
- MP3
- WAV
- AIFF
NOTE: Working with audio in Flash can take up a lot of resources. You might want to consider working with MP3 files over WAV and AIFF files since MP3 files are compressed and will take up less disk space. Also, if you wont be using the entire audio file, you might want to create a shorter version of the audio file using an audio editing application, and use that shortened version instead. This will help save more disk space.
To be able to add sound to the timeline of your Flash movie, import the audio file into your Flash document first. Heres how:
To be able to add sound to the timeline of your Flash movie, import the audio file into your Flash document first. Heres how:
- From the main menu, choose File > Import > Import to Library

- When the Import to Library dialog box comes up, navigate to the folder that contains the audio file, select the file, and click on Open

- Once Flash finishes importing the file, you should be able to see it in the Flash documents library

In the next article, were going to learn how to add imported audio files to a Flash documents timeline. That article is also going to talk about the difference between the Flash Event Sound and the Flash Stream Sound options - two options for synchronizing sound in Flash.
NEXT: Adding Sound to Flash Movie Timeline and Choosing Flash Sync Sound Options - Flash Event Sound vs Flash Stream Sound
How to Create an Account on Facebook Instructions Guides Tips and Training Video Tutorials
If you want to learn how to create an account on Facebook and youre looking for resources about Facebook - instructions, guides, tips, and training - check out these free Facebook video tutorials below. These are from the Facebook Essential Training Course by lynda.com. It will teach you the basics of creating an account on Facebook and managing it. It has topics on: finding and adding friends, liking pages, reading the News Feed, writing on a friend’s wall, updating your status, posting videos and links, creating a page for a business, protecting privacy and staying secure, deactivating an account, and more. Check out the free videos below to see start learning. To view the entire course, become a lynda.com member or sign up for a FREE 7-day trial.

 or
or 
or
or
Read more »
Facebook Essential Training by 
START LEARNING TODAY!
or WATCH THESE 5 FREE VIDEOS FROM THE COURSE
Facebook Essential Training - Welcome
Facebook Instructions - Changing your profile photo
Facebook Instructions - Understanding your News Feed
Facebook Instructions - Uploading videos
Facebook Instructions - Adding, removing, and blocking friends from your Chat list
Facebook Instructions - Changing your profile photo
Facebook Instructions - Understanding your News Feed
Facebook Instructions - Uploading videos
Facebook Instructions - Adding, removing, and blocking friends from your Chat list
START LEARNING TODAY!
or Course Information
Training Provider: Lynda.com
Title: Facebook Essential Training
Author: Garrick Chow
Duration: 3hrs 10mins
Date of release: 10 May 2011
Chapter 1: What Is Facebook?
Understanding Facebook and social networking
Chapter 2: Signing Up and Creating a Profile
Signing up with Facebook
Editing your profile
Changing your profile photo
Configuring your notifications
Chapter 3: Finding and Adding Friends
Understanding Facebook friends
Finding friends, family, and coworkers
Managing friend requests
Organizing friends into lists
Removing and blocking friends
Liking pages
Whats "poking"?
Chapter 4: Your Home Page and Your Wall
Understanding the home page
Understanding your News Feed
Understanding your Wall
Writing on a friends Wall
Chapter 5. Updating Your Status and Sharing
Content
Updating your status
Posting photos, videos, and links
Writing Notes
Tagging friends
Chapter 6: Managing Photos and Videos
Uploading photos and creating albums
Uploading videos
Tagging, editing, and deleting photos
Chapter 7: Sending and Receiving Private Messages
Sending private messages
Reading, replying to, and deleting private messages
Setting privacy for private messages
Chapter 8: Chatting
Displaying the Chat list and chatting with friends
Adding, removing, and blocking friends from your Chat list
Disabling Chat
Chapter 9: Searching Facebook
Searching for people
Searching for content
Editing your public search listing
Chapter 10: Facebook Groups
Searching for and joining groups
Creating and administering a group
Posting content to a group
Chapter 11: Facebook Applications
Understanding applications
Accepting, ignoring, and removing application requests
Installing and using applications
Viewing application settings and uninstalling applications
Chapter 12: Creating a Page for Your Business
Creating a page for your business, band, or organization
Assigning other people as administrators for your page
Using your page identity to post and comment on other peoples pages
Setting up a user name for your page
Chapter 13: Protecting Your Privacy and
Staying Secure
Choosing what to share publicly
Configuring sharing
Using https to log in
Using one-time passwords
Signing out remotely
Recognizing new devices accessing your account
Chapter 14: Taking a Break from Facebook
Downloading your information
Deactivating your account
Deleting your account
Training Provider: Lynda.com
Title: Facebook Essential Training
Author: Garrick Chow
Duration: 3hrs 10mins
Date of release: 10 May 2011
Chapter 1: What Is Facebook?
Understanding Facebook and social networking
Chapter 2: Signing Up and Creating a Profile
Signing up with Facebook
Editing your profile
Changing your profile photo
Configuring your notifications
Chapter 3: Finding and Adding Friends
Understanding Facebook friends
Finding friends, family, and coworkers
Managing friend requests
Organizing friends into lists
Removing and blocking friends
Liking pages
Whats "poking"?
Chapter 4: Your Home Page and Your Wall
Understanding the home page
Understanding your News Feed
Understanding your Wall
Writing on a friends Wall
Chapter 5. Updating Your Status and Sharing
Content
Updating your status
Posting photos, videos, and links
Writing Notes
Tagging friends
Chapter 6: Managing Photos and Videos
Uploading photos and creating albums
Uploading videos
Tagging, editing, and deleting photos
Chapter 7: Sending and Receiving Private Messages
Sending private messages
Reading, replying to, and deleting private messages
Setting privacy for private messages
Chapter 8: Chatting
Displaying the Chat list and chatting with friends
Adding, removing, and blocking friends from your Chat list
Disabling Chat
Chapter 9: Searching Facebook
Searching for people
Searching for content
Editing your public search listing
Chapter 10: Facebook Groups
Searching for and joining groups
Creating and administering a group
Posting content to a group
Chapter 11: Facebook Applications
Understanding applications
Accepting, ignoring, and removing application requests
Installing and using applications
Viewing application settings and uninstalling applications
Chapter 12: Creating a Page for Your Business
Creating a page for your business, band, or organization
Assigning other people as administrators for your page
Using your page identity to post and comment on other peoples pages
Setting up a user name for your page
Chapter 13: Protecting Your Privacy and
Staying Secure
Choosing what to share publicly
Configuring sharing
Using https to log in
Using one-time passwords
Signing out remotely
Recognizing new devices accessing your account
Chapter 14: Taking a Break from Facebook
Downloading your information
Deactivating your account
Deleting your account
About Lynda.com
Lynda.com is an online video training provider with over 1000 courses covering a wide array of topics - 3D, video, business, the web, graphic design, programming, animation, photography, and more. They produce top quality video tutorials with the best industry experts as your instructors. With a subscription, you can log-in at any time, and learn at your own pace. New courses are added each week, and you will receive a certificate of completion for each course that you finish.
Start learning today!
If you enjoyed the sample videos above and want to access the entire Facebook Essential Training course, you can sign up for a lynda.com membership. Your membership will allow you to access not only this course, but also the entire lynda.com library for as low as $25 for 1-month. Their training library has over 1000 courses with 50,000+ video tutorials. No long-term commitment required. You can cancel your membership at any time.
Not yet convinced? Try a FREE 7-day trial.
As a special promotion, visitors of this site can get a FREE 7-day trial to lynda.com. This free trial gives you access to their entire training library of over 1000 courses.
Sign-up for a lynda.com membership today to learn how to how to create an account on Facebook and to view all the Facebook instructions, guides, and Tips from this excellent video training course.Lynda.com is an online video training provider with over 1000 courses covering a wide array of topics - 3D, video, business, the web, graphic design, programming, animation, photography, and more. They produce top quality video tutorials with the best industry experts as your instructors. With a subscription, you can log-in at any time, and learn at your own pace. New courses are added each week, and you will receive a certificate of completion for each course that you finish.
Start learning today!
If you enjoyed the sample videos above and want to access the entire Facebook Essential Training course, you can sign up for a lynda.com membership. Your membership will allow you to access not only this course, but also the entire lynda.com library for as low as $25 for 1-month. Their training library has over 1000 courses with 50,000+ video tutorials. No long-term commitment required. You can cancel your membership at any time.
Not yet convinced? Try a FREE 7-day trial.
As a special promotion, visitors of this site can get a FREE 7-day trial to lynda.com. This free trial gives you access to their entire training library of over 1000 courses.
START LEARNING TODAY!
or Saturday, January 31, 2015
How to Recover Data in Urdu Hindi Tutorials
 DATA RECOVERY
 The history of DATARECOVERY dates from 1991, when we first applied our experience with data processing toward the recovery of digital data. Subsequently, the growing demand for such ability led to the commitment of our services to data analysis, processing and recovery.
 Data Recovery is not an easy task. Recovering critical data is a dedicated process that requires the right software, hardware and advanced methods in the hands of right recovery engineers. In order to save yourself from the problem of data lost, you must keep a backup of your important data. Backing up is the process of making and keeping copies of data at a desired destination, which may be used to restore the original in case of mishap of data loss. You should always keep multiple copies of files in data storage, so that if your original copy gets lost or damaged then you can easily get back your important file from backup.
Data loss may occur due to various reasons:
Accidentally deletion of files and folders
Human error
Physical damage of hard drive
Virus attack
System failure
Data is stored in Hard disk, an essential part of a computer system, which is also called HDD, Disk Drive, Hard Drive etc. If your hard disk is damaged, you will lose your data and you are left with one choice, that is, to repair the hard drive by de-fragmenting the operating system. It is possible that due to de-fragmentation some files gets overwritten and your problem may get higher. So, you need to be very careful. Data recovery software is an incomparable option in such a case. Hard drive recovery software can be used to perform recovery of data from any type of failure of hard drive such as crashed, damaged, corrupted, deleted, formatted and many more complex failures.
The experts of Hard drive data recovery will decide whether the problem is physical, logical or both. Physical problem occur in the hardware and logical problem occur on software configuration. Once it is decided that problem is physical then the accessibility of solution will be determined. If the hard drive data recovery experts obtain access to the drive, then they will create a sector by sector mirror image of the hard disk to their equipment where the process will continue. An assessment of the condition of the data structure will follow, as well as the identification of how much of the information is retrievable. When the hard drive data recovery assessment process is done, the results of the hard drive data recovery will be given.

Friday, January 30, 2015
How to Create a Quiz in Flash ActionScript 3 Tutorial PART 1
Exercise File
Start_Quiz_App.fla
In this tutorial, we are going to learn how to create a quiz in Flash using ActionScript 3. Were going to make use of arrays and for loops in order to complete this project.
This tutorial comes with an exercise file (the download link can be found at the top of the article). Lets go ahead and open it and take a look at its contents. This Flash movie has 2 frames. The first frame contains the elements needed for the user to take the quiz. The second frame contains elements that will display the results (answers and scores). The Flash movie should start at frame 1, and stay there until the user finishes answering all the questions. Once the user is done, the Flash movie goes to frame 2 where the answers are checked and the score is given. Since the quiz and the results are separated into two different frames, then the code will be separated as well. Frame 1 will contain the code that is needed to run the quiz (displaying questions and storing the answers submitted by the user), while frame 2 will contain the code that is needed to check the answers, compute the results and display them.
So first, lets go ahead and work on frame 1. Frame 1 contains 3 objects:
The first thing well do is to stop the Flash movie on frame 1. If we dont, then the movie will just continue looping between frames 1 and 2. So select frame 1 of the actions layer, then go to the Actions Panel and put in a stop action.
Next, lets create a couple of objects:
nQNumber
We will be storing the quiz questions in an array. Each question will therefore be numbered starting at 0. This nQNumber variable will be used to move through each of those quiz questions. After the user answers one question, we will have this number increase by one and use that number to retrieve the next question.
aQuestions
This is the array that will be used to store the questions.
aCorrectAnswers
This is the array that stores all the correct answers. Of course we will have to be the ones to provide what the correct answers are, which is why this array is already populated with values. When the array was created, the values were also declared in the array constructor, therefore populating the array. The first value will have an index of 0, the second value will have an index of 1, and so on... You will notice that the aQuestions array, which is supposed to store the questions, has not been given any values yet. Dont worry, well provide those values shortly using array access notation instead.
aUserAnswers
This array will be used to store the answers given by the user. Each time the user (the quiz taker) submits an answer, then that answer will go into this array. So we just create this array first, but we dont put any values in it initially. Well have to wait for what the user will input in the answer field and use those to populate this array instead.
Next, lets go ahead and create the questions. Weve provided 4 answers when the aCorrectAnswers array was created, so well need to provide 4 questions as well. Make sure that the order of the questions corresponds to the order of the answers as well (question index 0 should match answer index 0, question index 1 should match answer index 1, and so on...). We will populate the aQuestions array using Array Access Notation:
So now that weve created all the needed objects and have added all the questions and answers for this first part of our project, lets now go ahead and create the actual quiz functionality.
The first thing well do is display the first question in the questions_txt TextField. So what we can do is get aQuestions[0] (the 0 index corresponds to the first item in the array, and therefore the first question) and assign it to the text property of our TextField like so: questions_txt.text = aQuestions[0] . But the problem here is that wed like to be able to update to the next question after the user finishes answering the first one. So instead of manually inputting the index number, we can make use of a variable instead. And then we can just update that variable whenever needed. This is where our nQNumber variable comes in. Initially, it has a value of 0, so typing in questions_txt.text = aQuestions[nQNumber] will be the the same as typing in questions_txt.text = aQuestions[0] . And then later on, well add some code that will increment the value of nQNumber every time the user submits an answer, thereby updating to the next question. But first, update your code so that the first question will be displayed in the questions_txt TextField:
And now that we have that, the next thing we need to fix is how our Flash movie is going to respond whenever a quiz taker types an answer in the input field and clicks on the submit button. So lets break it down. When the user clicks on the submit button, our flash movie should:
Since we want all this to happen whenever the user clicks on the button, well have to create a CLICK event handler for submit_btn. And lets give the event listener function the name quiz.
Why will there be a problem? There are 4 questions, so naturally, the user will end up clicking the submit button for a total of 4 times.
Yes that is true. But the 4th time the user clicks on the button, nQNumber will be increased to 4. And recall that our array index numbers start at 0, not at 1. So the last question is actually at aQuestions[3]. And aQuestions[4] is actually for a fifth question. But there is no fifth question, and trying to retrieve one from the array will cause an error.
So what do we do then?
Well need to put an if statement that will tell our Flash movie to no longer try to retrieve any more questions, once we get to the last one.
So lets do that now. We need to get the line questions_txt.text = aQuestions[nQNumber]; and place it in an if statement. The if statement needs to check if nQNumber is less than 4. If nQNumber is still less than 4, then go ahead and retrieve the next question. If it is no longer less than 4, then we dont want our code to retrieve any more questions. So we can type in if(nQNumber < 4) as our condition. But... thats actually not what well do. Instead of typing in 4, well use aQuestions.length instead. The length property of the array class tells us how many items there are in the array. So if an array has 5 items, then the array length will be 5. If it has 6 items, then the length will be 6. In this particular example, our array has 4 items, and therefore has an array length of 4.
Why cant I just type in 4? Is there a benefit to using the length property instead?
Well, no one is stopping you from hard-coding in a value of 4, but the great thing about making use of the length property instead is that if you decide to add more questions (or maybe remove some questions), then you wont have to go back to the if statement and hard-code in a new value. The length property will automatically update itself once you add or reduce items in the array. This will be especially useful if you had numerous items in your code that need to reference how long your array is. Imagine if you hard-coded the data numerous times in different parts of your code. Then every time you decide to add or subtract items to the array, then youll have to go back to all those hard-coded parts of your code, and manually change the value. That would not be very efficient.
So our updated event listener function will now look like this:
Great! So once the user gets through all the questions, what do we do next?
We then tell the Flash movie to go to the next frame where the user will get the quiz results. To do that, we just add an else clause to our if statement that will instruct our Flash movie to go the the next frame. We will use the nextFrame() method of the MovieClip class to move the playhead to the next frame. So basically, what were telling our Flash movie is that if nQNumber is no longer less than aQuestions.length, then it means that we dont have anymore questions and the quiz is done, and it can now move to frame 2 where the results will be displayed. So finally, our updated event listener function will look like this:
In the next part of this tutorial, we will work on the code that will display the answers that the user submitted alongside the correct answers. We will also work on the code that will check the answers and calculate and display the users score.
Heres the frame 1 code in full:
NEXT: How to Create a Quiz in Flash - ActionScript 3 Tutorial - PART 2
Read more »
Start_Quiz_App.fla
In this tutorial, we are going to learn how to create a quiz in Flash using ActionScript 3. Were going to make use of arrays and for loops in order to complete this project.
This tutorial comes with an exercise file (the download link can be found at the top of the article). Lets go ahead and open it and take a look at its contents. This Flash movie has 2 frames. The first frame contains the elements needed for the user to take the quiz. The second frame contains elements that will display the results (answers and scores). The Flash movie should start at frame 1, and stay there until the user finishes answering all the questions. Once the user is done, the Flash movie goes to frame 2 where the answers are checked and the score is given. Since the quiz and the results are separated into two different frames, then the code will be separated as well. Frame 1 will contain the code that is needed to run the quiz (displaying questions and storing the answers submitted by the user), while frame 2 will contain the code that is needed to check the answers, compute the results and display them.
So first, lets go ahead and work on frame 1. Frame 1 contains 3 objects:
- questions_txt - This is a Dynamic TextField that will be used to display the questions. In the Properties Inspector, this TextField has been set to be multilined.
- answers_txt - This is an Input TextField where the user will type in the answer. In the Properties Inspector, this TextField has been set to have a border and to be a single line TextField.
- submit_btn - This button will be used by the user to submit each answer.
The first thing well do is to stop the Flash movie on frame 1. If we dont, then the movie will just continue looping between frames 1 and 2. So select frame 1 of the actions layer, then go to the Actions Panel and put in a stop action.
stop();
Next, lets create a couple of objects:
stop();What are these instances for?
var nQNumber:Number = 0;
var aQuestions:Array = new Array();
var aCorrectAnswers:Array = new Array("Jupiter", "Mars", "war", "Titan");
var aUserAnswers:Array = new Array();
nQNumber
We will be storing the quiz questions in an array. Each question will therefore be numbered starting at 0. This nQNumber variable will be used to move through each of those quiz questions. After the user answers one question, we will have this number increase by one and use that number to retrieve the next question.
aQuestions
This is the array that will be used to store the questions.
aCorrectAnswers
This is the array that stores all the correct answers. Of course we will have to be the ones to provide what the correct answers are, which is why this array is already populated with values. When the array was created, the values were also declared in the array constructor, therefore populating the array. The first value will have an index of 0, the second value will have an index of 1, and so on... You will notice that the aQuestions array, which is supposed to store the questions, has not been given any values yet. Dont worry, well provide those values shortly using array access notation instead.
aUserAnswers
This array will be used to store the answers given by the user. Each time the user (the quiz taker) submits an answer, then that answer will go into this array. So we just create this array first, but we dont put any values in it initially. Well have to wait for what the user will input in the answer field and use those to populate this array instead.
Next, lets go ahead and create the questions. Weve provided 4 answers when the aCorrectAnswers array was created, so well need to provide 4 questions as well. Make sure that the order of the questions corresponds to the order of the answers as well (question index 0 should match answer index 0, question index 1 should match answer index 1, and so on...). We will populate the aQuestions array using Array Access Notation:
var nQNumber:Number = 0;
var aQuestions:Array = new Array();
var aCorrectAnswers:Array = new Array("Jupiter", "Mars", "war", "Titan");
var aUserAnswers:Array = new Array();
aQuestions[0] = "What is the biggest planet in our solar system?";
aQuestions[1] = "Which planet in our solar system is the 4th planet from the sun?";
aQuestions[2] = "Mars is named after the Roman god of ___.";
aQuestions[3] = "What is the name of Saturns largest moon?";
So now that weve created all the needed objects and have added all the questions and answers for this first part of our project, lets now go ahead and create the actual quiz functionality.
The first thing well do is display the first question in the questions_txt TextField. So what we can do is get aQuestions[0] (the 0 index corresponds to the first item in the array, and therefore the first question) and assign it to the text property of our TextField like so: questions_txt.text = aQuestions[0] . But the problem here is that wed like to be able to update to the next question after the user finishes answering the first one. So instead of manually inputting the index number, we can make use of a variable instead. And then we can just update that variable whenever needed. This is where our nQNumber variable comes in. Initially, it has a value of 0, so typing in questions_txt.text = aQuestions[nQNumber] will be the the same as typing in questions_txt.text = aQuestions[0] . And then later on, well add some code that will increment the value of nQNumber every time the user submits an answer, thereby updating to the next question. But first, update your code so that the first question will be displayed in the questions_txt TextField:
aQuestions[0] = "What is the biggest planet in our solar system?";So now, if you test the movie, you should see the first question displayed in the TextField.
aQuestions[1] = "Which planet in our solar system is the 4th planet from the sun?";
aQuestions[2] = "Mars is named after the Roman god of ___.";
aQuestions[3] = "What is the name of Saturns largest moon?";
questions_txt.text = aQuestions[nQNumber];
And now that we have that, the next thing we need to fix is how our Flash movie is going to respond whenever a quiz taker types an answer in the input field and clicks on the submit button. So lets break it down. When the user clicks on the submit button, our flash movie should:
- get the users answer (what he or she inputs in the answer field) and add it to the aUserAnswers array
- update to the next question
Since we want all this to happen whenever the user clicks on the button, well have to create a CLICK event handler for submit_btn. And lets give the event listener function the name quiz.
questions_txt.text = aQuestions[nQNumber];
submit_btn.addEventListener(MouseEvent.CLICK, quiz);
function quiz(e:MouseEvent):void
{
// This function will be responsible for:
// 1. pushing the users answers to the aCorrectAnswers array
// 2. updating to the next question
}function quiz(e:MouseEvent):void
{
aUserAnswers.push(answers_txt.text);
answers_txt.text = ""; // This line puts an empty string, making the TextField appear empty again
}function quiz(e:MouseEvent):void
{
aUserAnswers.push(answers_txt.text);
answers_txt.text = "";
nQNumber++;
questions_txt.text = aQuestions[nQNumber];
}Why will there be a problem? There are 4 questions, so naturally, the user will end up clicking the submit button for a total of 4 times.
Yes that is true. But the 4th time the user clicks on the button, nQNumber will be increased to 4. And recall that our array index numbers start at 0, not at 1. So the last question is actually at aQuestions[3]. And aQuestions[4] is actually for a fifth question. But there is no fifth question, and trying to retrieve one from the array will cause an error.
So what do we do then?
Well need to put an if statement that will tell our Flash movie to no longer try to retrieve any more questions, once we get to the last one.
So lets do that now. We need to get the line questions_txt.text = aQuestions[nQNumber]; and place it in an if statement. The if statement needs to check if nQNumber is less than 4. If nQNumber is still less than 4, then go ahead and retrieve the next question. If it is no longer less than 4, then we dont want our code to retrieve any more questions. So we can type in if(nQNumber < 4) as our condition. But... thats actually not what well do. Instead of typing in 4, well use aQuestions.length instead. The length property of the array class tells us how many items there are in the array. So if an array has 5 items, then the array length will be 5. If it has 6 items, then the length will be 6. In this particular example, our array has 4 items, and therefore has an array length of 4.
Why cant I just type in 4? Is there a benefit to using the length property instead?
Well, no one is stopping you from hard-coding in a value of 4, but the great thing about making use of the length property instead is that if you decide to add more questions (or maybe remove some questions), then you wont have to go back to the if statement and hard-code in a new value. The length property will automatically update itself once you add or reduce items in the array. This will be especially useful if you had numerous items in your code that need to reference how long your array is. Imagine if you hard-coded the data numerous times in different parts of your code. Then every time you decide to add or subtract items to the array, then youll have to go back to all those hard-coded parts of your code, and manually change the value. That would not be very efficient.
So our updated event listener function will now look like this:
function quiz(e:MouseEvent):void
{
aUserAnswers.push(answers_txt.text);
answers_txt.text = "";
nQNumber++;
if(nQNumber < aQuestions.length)
{
questions_txt.text = aQuestions[nQNumber];
}
}Great! So once the user gets through all the questions, what do we do next?
We then tell the Flash movie to go to the next frame where the user will get the quiz results. To do that, we just add an else clause to our if statement that will instruct our Flash movie to go the the next frame. We will use the nextFrame() method of the MovieClip class to move the playhead to the next frame. So basically, what were telling our Flash movie is that if nQNumber is no longer less than aQuestions.length, then it means that we dont have anymore questions and the quiz is done, and it can now move to frame 2 where the results will be displayed. So finally, our updated event listener function will look like this:
function quiz(e:MouseEvent):void
{
aUserAnswers.push(answers_txt.text);
answers_txt.text = "";
nQNumber++;
if(nQNumber < aQuestions.length)
{
questions_txt.text = aQuestions[nQNumber];
}
else
{
nextFrame();
}
}In the next part of this tutorial, we will work on the code that will display the answers that the user submitted alongside the correct answers. We will also work on the code that will check the answers and calculate and display the users score.
Heres the frame 1 code in full:
stop();

var nQNumber:Number = 0;
var aQuestions:Array = new Array();
var aCorrectAnswers:Array = new Array("Jupiter", "Mars", "war", "Titan");
var aUserAnswers:Array = new Array();
aQuestions[0] = "What is the biggest planet in our solar system?";
aQuestions[1] = "Which planet in our solar system is the 4th planet from the sun?";
aQuestions[2] = "Mars is named after the Roman god of ___.";
aQuestions[3] = "What is the name of Saturns largest moon?";

questions_txt.text = aQuestions[nQNumber];
submit_btn.addEventListener(MouseEvent.CLICK, quiz);
function quiz(e:MouseEvent):void
{
     aUserAnswers.push(answers_txt.text);
     answers_txt.text = "";
     nQNumber++;
     if(nQNumber < aQuestions.length)
     {
          questions_txt.text = aQuestions[nQNumber];
     }
     else
     {
          nextFrame();
     }
}NEXT: How to Create a Quiz in Flash - ActionScript 3 Tutorial - PART 2
AdvAlert AS3 class Download and How To Use Part 7
Today Ill show you how to create a simple skin set.
By skin set I mean a few skins of the same design, but different functionality and goal.
For example, today well create 3 skins of one design for warning messages, information messages, and confirmation windows.
You can see the final results in the end of this tutorial.
The source code for todays tutorial can be found here.
You can unpack the package now and look at the contents. Youll see that the AdvAlert class is stored in the com folder, and there are 3 pictures and 2 sounds in the rsrc folder. The code of the example is in main.as file of the root folder.
The pictures and sounds from the rsrc folder are embedded into the final swf file. You can see that embedding resources and using them as dynamic content does not require you to use Flash IDE.
I will now explain what each part of main.as code does.
You can see that the first thing we do is declare the essential variables. Theres only one in this case - AlertManager:
Then we embed each resource:
And then we declare 6 variables for 3 skins:
In the init() function we first set AlertManager to a new AdvAlertManager:
And then proceed to stylize the 3 skins:
I also have this bit of code that just displays the alert windows as an example, one after another (with some interaction involved). This code functions called confirm, warn, and info, which we will create shortly.
Then we create 3 functions - warn, info and confirm, which use the 3 different skins:
And thats it! Now we can use these handy alert windows of different types in games and applications with minimum number of lines.
Using this principle, you can create your own skin sets and introduce new window types.
Thanks for reading!
Read more »
By skin set I mean a few skins of the same design, but different functionality and goal.
For example, today well create 3 skins of one design for warning messages, information messages, and confirmation windows.
You can see the final results in the end of this tutorial.
The source code for todays tutorial can be found here.
You can unpack the package now and look at the contents. Youll see that the AdvAlert class is stored in the com folder, and there are 3 pictures and 2 sounds in the rsrc folder. The code of the example is in main.as file of the root folder.
The pictures and sounds from the rsrc folder are embedded into the final swf file. You can see that embedding resources and using them as dynamic content does not require you to use Flash IDE.
I will now explain what each part of main.as code does.
You can see that the first thing we do is declare the essential variables. Theres only one in this case - AlertManager:
// Essential variables
private var AlertManager:AdvAlertManager;
Then we embed each resource:
// Embedded resources
[Embed(source = "rsrc/warning.png")]
private var warning_icon:Class;
[Embed(source = "rsrc/info.png")]
private var info_icon:Class;
[Embed(source = "rsrc/confirm.png")]
private var confirm_icon:Class;
[Embed(source = "rsrc/critical.mp3")]
private var warning_sound:Class;
[Embed(source = "rsrc/info.mp3")]
private var info_sound:Class;
And then we declare 6 variables for 3 skins:
// Skins
private var skin_warning:AdvAlertSkin = new AdvAlertSkin();
private var buttonskin_warning:AdvAlertButtonSkin = new AdvAlertButtonSkin();
private var skin_info:AdvAlertSkin = new AdvAlertSkin();
private var buttonskin_info:AdvAlertButtonSkin = new AdvAlertButtonSkin();
private var skin_confirm:AdvAlertSkin = new AdvAlertSkin();
private var buttonskin_confirm:AdvAlertButtonSkin = new AdvAlertButtonSkin();
In the init() function we first set AlertManager to a new AdvAlertManager:
// Declare AlertManager
AlertManager = new AdvAlertManager(this, stage, null, null, null, true, 300, 0, 160);
And then proceed to stylize the 3 skins:
// Warning skin
skin_warning.bgRect = new SolidColorRect(0xe2e2e2, [5, 5, 5, 5], 1);
skin_warning.bgStroke = new SolidColorStroke(1, 0x000000, 0);
skin_warning.headerHeight = 34;
skin_warning.headerRect = new SolidColorRect(0x99ccff, [5, 5, 0, 0], 1);
skin_warning.headerPadding = new TextPadding(0, 0, 0, 0);
skin_warning.titleFormat = new TextFormat("Verdana", 22, 0xffffff);
skin_warning.titleFilters = [new DropShadowFilter(1, 45, 0x000000, 0.7, 0, 0)];
skin_warning.textFormat = new TextFormat("Verdana", 15, 0x111111);
skin_warning.blurColor = 0x000000;
skin_warning.buttonbarPadding.bottom = 0;
skin_warning.addContent(warning_icon, new Point(5, 40));
skin_warning.textPadding = new TextPadding(5, 5, 5, 125);
buttonskin_warning.bgRect = new SolidColorRect(0x99ccff, [5, 5, 0, 0], 1);
buttonskin_warning.bgStroke = new SolidColorStroke(1, 0x000000, 0);
buttonskin_warning.textFormat = new TextFormat("Verdana", 17, 0xffffff, null, null, null, null, null, "center" );
buttonskin_warning.textFilters = [new DropShadowFilter(1, 45, 0x000000, 0.7, 0, 0)];
buttonskin_warning.hover_bgRect = new SolidColorRect(0x7799bb, [5, 5, 0, 0], 1);
buttonskin_warning.hover_bgStroke = new SolidColorStroke(1, 0x000000, 0);
buttonskin_warning.hover_textFormat = new TextFormat("Verdana", 17, 0xffffff, null, null, null, null, null, "center" );
buttonskin_warning.hover_textFilters = [new DropShadowFilter(1, 45, 0x000000, 0.7, 0, 0)];

// Information skin
skin_info.bgRect = new SolidColorRect(0xe2e2e2, [5, 5, 5, 5], 1);
skin_info.bgStroke = new SolidColorStroke(1, 0x000000, 0);
skin_info.headerHeight = 34;
skin_info.headerRect = new SolidColorRect(0x99ccff, [5, 5, 0, 0], 1);
skin_info.headerPadding = new TextPadding(0, 0, 0, 0);
skin_info.titleFormat = new TextFormat("Verdana", 22, 0xffffff);
skin_info.titleFilters = [new DropShadowFilter(1, 45, 0x000000, 0.7, 0, 0)];
skin_info.textFormat = new TextFormat("Verdana", 15, 0x111111);
skin_info.blurColor = 0x000000;
skin_info.buttonbarPadding.bottom = 0;
skin_info.addContent(info_icon, new Point(5, 40));
skin_info.textPadding = new TextPadding(5, 5, 5, 125);
buttonskin_info.bgRect = new SolidColorRect(0x99ccff, [5, 5, 0, 0], 1);
buttonskin_info.bgStroke = new SolidColorStroke(1, 0x000000, 0);
buttonskin_info.textFormat = new TextFormat("Verdana", 17, 0xffffff, null, null, null, null, null, "center" );
buttonskin_info.textFilters = [new DropShadowFilter(1, 45, 0x000000, 0.7, 0, 0)];
buttonskin_info.hover_bgRect = new SolidColorRect(0x7799bb, [5, 5, 0, 0], 1);
buttonskin_info.hover_bgStroke = new SolidColorStroke(1, 0x000000, 0);
buttonskin_info.hover_textFormat = new TextFormat("Verdana", 17, 0xffffff, null, null, null, null, null, "center" );
buttonskin_info.hover_textFilters = [new DropShadowFilter(1, 45, 0x000000, 0.7, 0, 0)];

// Confirmation skin
skin_confirm.bgRect = new SolidColorRect(0xe2e2e2, [5, 5, 5, 5], 1);
skin_confirm.bgStroke = new SolidColorStroke(1, 0x000000, 0);
skin_confirm.headerHeight = 34;
skin_confirm.headerRect = new SolidColorRect(0x99ccff, [5, 5, 0, 0], 1);
skin_confirm.headerPadding = new TextPadding(0, 0, 0, 0);
skin_confirm.titleFormat = new TextFormat("Verdana", 22, 0xffffff);
skin_confirm.titleFilters = [new DropShadowFilter(1, 45, 0x000000, 0.7, 0, 0)];
skin_confirm.textFormat = new TextFormat("Verdana", 15, 0x111111);
skin_confirm.blurColor = 0x000000;
skin_confirm.buttonbarPadding.bottom = 0;
skin_confirm.addContent(confirm_icon, new Point(5, 40));
skin_confirm.textPadding = new TextPadding(5, 5, 5, 125);
buttonskin_confirm.bgRect = new SolidColorRect(0x99ccff, [5, 5, 0, 0], 1);
buttonskin_confirm.bgStroke = new SolidColorStroke(1, 0x000000, 0);
buttonskin_confirm.textFormat = new TextFormat("Verdana", 17, 0xffffff, null, null, null, null, null, "center" );
buttonskin_confirm.textFilters = [new DropShadowFilter(1, 45, 0x000000, 0.7, 0, 0)];
buttonskin_confirm.hover_bgRect = new SolidColorRect(0x7799bb, [5, 5, 0, 0], 1);
buttonskin_confirm.hover_bgStroke = new SolidColorStroke(1, 0x000000, 0);
buttonskin_confirm.hover_textFormat = new TextFormat("Verdana", 17, 0xffffff, null, null, null, null, null, "center" );
buttonskin_confirm.hover_textFilters = [new DropShadowFilter(1, 45, 0x000000, 0.7, 0, 0)];
I also have this bit of code that just displays the alert windows as an example, one after another (with some interaction involved). This code functions called confirm, warn, and info, which we will create shortly.
// Test different window types
var timer:Timer = new Timer(1000, 1);
timer.addEventListener(TimerEvent.TIMER, onTimer);
timer.start();
function onTimer(evt:TimerEvent):void {
warn("The specified E-mail address is not valid!", "Warning!", closeWarn);
}
function closeWarn(response:String):void {
confirm("Are you sure you want to exit?", "Confirmation", onYes, onNo);
}
function onYes():void {
info("You answered Yes!", "Notice!");
}
function onNo():void {
info("You answered No!", "Notice!");
}
Then we create 3 functions - warn, info and confirm, which use the 3 different skins:
public function warn(message:String, title:String, handler:Function = null):void {
var warnSound:Sound = new warning_sound();
AlertManager.reset(this, stage, skin_warning, buttonskin_warning, warnSound, true, 300, 0, 160);
AlertManager.alert(message, title, null, 0, handler);
}

public function info(message:String, title:String):void {
var infoSound:Sound = new info_sound();
AlertManager.reset(this, stage, skin_info, buttonskin_info, infoSound, true, 300, 0, 160);
AlertManager.alert(message, title);
}

public function confirm(message:String, title:String, handlerYes:Function = null, handlerNo:Function = null):void {
var infoSound:Sound = new info_sound();
AlertManager.reset(this, stage, skin_confirm, buttonskin_confirm, infoSound, true, 300, 0, 160);
AlertManager.alert(message, title, [new AdvAlertButton("Yes"), new AdvAlertButton("No")], 0, handler);
function handler(response:String):void {
if (response == "Yes") handlerYes.call();
if (response == "No") handlerNo.call();
}
}
And thats it! Now we can use these handy alert windows of different types in games and applications with minimum number of lines.
Using this principle, you can create your own skin sets and introduce new window types.
Thanks for reading!
How to Prevent Unwanted apps purchase in Android
How to Prevent In App Purchase or Accidently Purchase/Unwanted apps purchase in Android

Mostly Parents use their credit card information to purchase Android Apps which help them in daily life routine . But they forget to remove their account information and hand over their smartphones , or Android tablets to childs to play the amazing android games but when they got bill at month end "They Shout, I did not made purchase " . Applying theses setting can prevent unwanted,accidently app purchase from childs.
For Android smartphones and tablets .
Slide Play Store menu from left .
Click on Setting
Under "User Control" touch the "Require Password for Purchase ".
Choose Password
- For All purchase
- Every 30 minutes
- Never
Select your password by typing.
This setting can save your money wasting on unwanted app purchase.
Wednesday, January 28, 2015
EasyTooltip free AS3 tooltip library HOW TO CUSTOMIZE
Today Ill explain how to style tooltips made using EasyTooltip class.
To change the appearance of tooltips, create a new TooltipStyle object, set its properties and then apply it to the EasyTooltip instance using EasyTooltips setStyle() method.
To edit the text appearance, use the textAlpha, textFormat and textPadding properties of the TooltipStyle object.
To change the position of the tooltip relative to mouse, use the offsetX and offsetY properties.
You can use minWidth, maxWidth, minHeight and maxHeight to set size limits for your tooltips.
You can apply an array of filters to the filters property of the TooltipStyle object.
The remaining 3 properties are backgroundRect, backgroundStroke and dynamicContent. Lets start with dynamic content.
Normally, you wouldnt need to edit contents of the dynamicContent array manually. Theres a method that lets you add a visual element to the tooltip (such as an icon) without having to touch the array. The method is called addContent().
There are 3 parameters in the function - class of the visual object, x and y offsets. The class is passed instead of a class instance, because objects of that class will be created automatically. In the example below, myIcon is the name of a class that extends MovieClip and just contains a small image.

There are 3 background fill types for the tooltip box, and 3 background stroke types. Those are solid color fill and stroke, gradient color fill and stroke, and bitmap fill and stroke. Any fill type can be used in combination with any stroke.
You can set the backgroundRect property value to an instance of SolidColorRect, GradientColorRect or BitmapColorRect class. Similarly, youcan set the backgroundStroke property value to an instance of SolidColorStroke, GradientColorStroke or BitmapColorStroke class.
Use the properties of these classes to customize your tooltip appearances. Below are 3 examples using all of the classes:


Using all these tools you can customize your tooltips to look the way you want them to.
Thanks for reading!
Read more »
To change the appearance of tooltips, create a new TooltipStyle object, set its properties and then apply it to the EasyTooltip instance using EasyTooltips setStyle() method.
To edit the text appearance, use the textAlpha, textFormat and textPadding properties of the TooltipStyle object.
To change the position of the tooltip relative to mouse, use the offsetX and offsetY properties.
You can use minWidth, maxWidth, minHeight and maxHeight to set size limits for your tooltips.
You can apply an array of filters to the filters property of the TooltipStyle object.
The remaining 3 properties are backgroundRect, backgroundStroke and dynamicContent. Lets start with dynamic content.
Normally, you wouldnt need to edit contents of the dynamicContent array manually. Theres a method that lets you add a visual element to the tooltip (such as an icon) without having to touch the array. The method is called addContent().
There are 3 parameters in the function - class of the visual object, x and y offsets. The class is passed instead of a class instance, because objects of that class will be created automatically. In the example below, myIcon is the name of a class that extends MovieClip and just contains a small image.
var myStyle:TooltipStyle = new TooltipStyle();
myStyle.maxWidth = 0;
myStyle.offsetX = -10;
myStyle.offsetY = -10;

myStyle.addContent(myIcon, 5, 5);

tooltip = new EasyTooltip(stage, stage.stageWidth, stage.stageHeight);
tooltip.setStyle(myStyle);
tooltip.addListener(object1, "    Example of dynamic content usage. ");
There are 3 background fill types for the tooltip box, and 3 background stroke types. Those are solid color fill and stroke, gradient color fill and stroke, and bitmap fill and stroke. Any fill type can be used in combination with any stroke.
You can set the backgroundRect property value to an instance of SolidColorRect, GradientColorRect or BitmapColorRect class. Similarly, youcan set the backgroundStroke property value to an instance of SolidColorStroke, GradientColorStroke or BitmapColorStroke class.
Use the properties of these classes to customize your tooltip appearances. Below are 3 examples using all of the classes:
var myStyle:TooltipStyle = new TooltipStyle();
myStyle.backgroundRect = new SolidColorRect(0x880000, [10, 0, 10, 0], 1);
myStyle.backgroundStroke = new SolidColorStroke(2, 0xcc0000, 1);
myStyle.offsetX = -10;
myStyle.offsetY = -10;

tooltip = new EasyTooltip(stage, stage.stageWidth, stage.stageHeight);
tooltip.setStyle(myStyle);
tooltip.addListener(object1, "Example of using solid color fill and stroke. ");
var myStyle:TooltipStyle = new TooltipStyle();
myStyle.minWidth = 240;
myStyle.maxWidth = 0;
myStyle.offsetX = -10;
myStyle.offsetY = -10;
var matrix1:Matrix = new Matrix();
matrix1.createGradientBox(240, 200, 1.57);
myStyle.backgroundRect = new GradientColorRect(GradientType.LINEAR, [0, 0], [0.2, 1], [0, 255], matrix1, "pad", "rgb", 0, [0, 0, 0, 0]);

var matrix2:Matrix = new Matrix();
matrix2.createGradientBox(240, 200, 1.57);
myStyle.backgroundStroke = new GradientColorStroke(2, GradientType.LINEAR, [0x000000, 0xffffff], [1, 1], [0, 255], matrix2, "pad", "rgb", 0);

tooltip = new EasyTooltip(stage, stage.stageWidth, stage.stageHeight);
tooltip.setStyle(myStyle);
tooltip.addListener(object1, "Example of gradient fill and stroke usage. ");
var myStyle:TooltipStyle = new TooltipStyle();
myStyle.minWidth = 240;
myStyle.maxWidth = 0;
myStyle.offsetX = -10;
myStyle.offsetY = -10;

var myBitmap:BitmapData = new BitmapData(200, 100, false, 0x000000);
myBitmap.perlinNoise(200, 100, 3, 7, true, true);

var myBitmap2:BitmapData = new BitmapData(200, 100, false, 0x000000);
myBitmap2.perlinNoise(100, 100, 3, 11, true, true);

myStyle.backgroundRect = new BitmapRect(myBitmap, new Matrix(), true, true, [10, 10, 10, 10]);
myStyle.backgroundStroke = new BitmapStroke(2, myBitmap2, new Matrix(), true, true);

tooltip = new EasyTooltip(stage, stage.stageWidth, stage.stageHeight);
tooltip.setStyle(myStyle);
tooltip.addListener(object1, "Example of bitmap fill and stroke usage. ");
Using all these tools you can customize your tooltips to look the way you want them to.
Thanks for reading!
Tuesday, January 27, 2015
How to Your Data Full Protect in Urdu Hindi


USB Block:
USB Block is a data leak prevention tool. It prevents leakage and copy of your data to USB Drives, External Drives, CDs/DVDs or other such portable devices. Once installed, USB Block lets you block all such drives and devices that do not belong to you. With USB Block, you can share your PC with anyone without fear of data theft. USB Block also lets you create a list of devices and drives you authorize with a password so that only your USB drives or CDs can be accessed on your computer.
اسلام علیکم! کیا آپ چاہتے ہیں کہ آپ کے سسٹم سے کوئی آپ کی غیر موجودگی میں ڈیٹا چوری نہ کرے
اگر ہاں تو پھر آپ انسٹال کریں (یو ایس بی بلاک) اس سوفٹ ویئر کو انسٹال کرنے کے بعد کوئی آپ کے سسٹم ڈیٹا چوری نہیں کرسکے گا کیونکہ اس سوفٹ ویئر میں شامل ہیں۔
بلاک یو ایس بی ڈیوایس: جس کے زریعے آپ یو ایس بی ڈرائیو، میموری کارڈ اور دوسرے ایکسٹرنل ڈرائیو کو بُلاک کرسکتے ہیں۔
بُلاک سی ڈی ، ڈی وی وی اور فلوپی: جس کے زریعے آپ سی ڈی ، ڈی وی وی اور فلوپی ڈرائیور کو بُلاک کرسکتے ہیں۔
بلاک نیٹ ورک تک رسائی: جس کے زریعے آپ نیٹ ورک تک رسائی کو بُلاک کرسکتے ہیں۔یعنی اگر آپ چاہتے ہیں کہ نیٹ ورک میں دوسرے پی سی آپ کے سسٹم تک رسائی نہ کریں تو اس کےلیے آپ یہ آپشین استعمال کرسکتے ہیں۔
DOWNLOAD
DOWNLOAD


Subscribe to:
Posts (Atom)