Tuesday, February 3, 2015
Android beginner tutorial Part 40 AlertDialog class
There are many types of Dialogs in Android - pop up windows that inform, confirm or request data from the user. Today well take a look at the AlertDialog class - a simple pop up dialog window that can display a title, a text message, and up to 3 buttons - a positive one, a negative one and a neutral one. Its also possible to display more complex things here like lists and switches, but well get to that later.
First, go to the main Activity layout XML and add a button.
<LinearLayout xmlns:android="http://schemas.android.com/apk/res/android"
    xmlns:tools="http://schemas.android.com/tools"
    android:layout_width="match_parent"
    android:layout_height="match_parent"
    android:orientation="vertical"
    tools:context=".MainActivity" >

<Button
    android:id="@+id/testButton"
    android:layout_width="fill_parent"
    android:layout_height="wrap_content"
    android:text="Call an AlertDialog"
    />

</LinearLayout>
Now go to MainActivity.java class. Here, create a reference to the button in the layout and add a click event listener for it.
In the onClick handler function of the listener, well create the AlertDialog. First, declare a builder variable of AlertDialog.Builder class.
AlertDialog.Builder builder = new AlertDialog.Builder(MainActivity.this);
Now we can customize it. I want the dialog window to have 2 buttons - Yes and No, and the Yes button closes the application, while the No button closes just the dialog.
Set the title and message of the dialog:
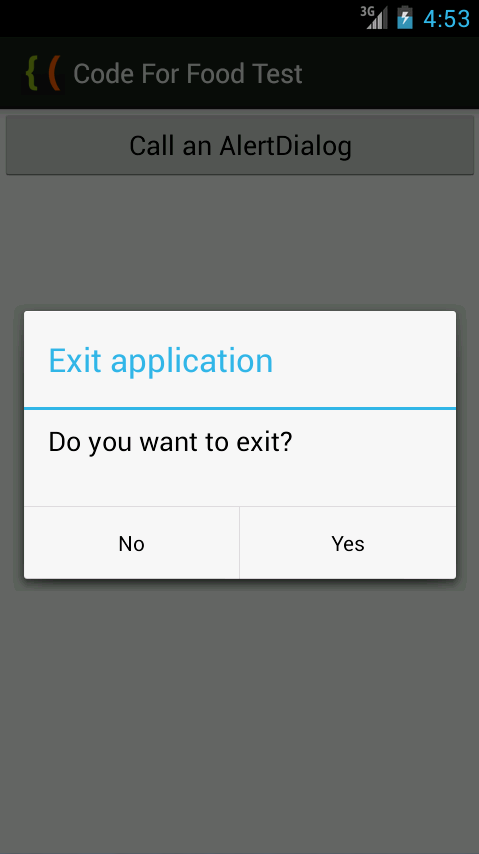
builder.setTitle("Exit application");
builder.setMessage("Do you want to exit?");
Create a positive button using setPositiveButton() method. It has 2 parameters - label of the button and OnClickListener of the button. We can close the application using MainActivity.this.finish():
builder.setPositiveButton("Yes", new DialogInterface.OnClickListener() {
@Override
public void onClick(DialogInterface dialog, int which) {
MainActivity.this.finish();
}
});
Negative button is created similarly:
builder.setNegativeButton("No", new DialogInterface.OnClickListener() {
@Override
public void onClick(DialogInterface dialog, int which) {
dialog.cancel();
}
});
Then we can make it impossible for the user to close the dialog by pressing "Back" button on their device. Do this using the setCancelable() method:
builder.setCancelable(false);
Create an AlertDialog instance, set its value to builder.create(). Then use show() method of the dialog to display it.
AlertDialog myDialog = builder.create();
myDialog.show();
Full MainActivity.java code:
package com.kircode.codeforfood_test;

import android.app.Activity;
import android.app.AlertDialog;
import android.content.DialogInterface;
import android.os.Bundle;
import android.view.Menu;
import android.view.View;
import android.widget.Button;

public class MainActivity extends Activity{

@Override
protected void onCreate(Bundle savedInstanceState) {
super.onCreate(savedInstanceState);
setContentView(R.layout.activity_main);

Button button = (Button)findViewById(R.id.testButton);

button.setOnClickListener(new View.OnClickListener() {

@Override
public void onClick(View v) {
AlertDialog.Builder builder = new AlertDialog.Builder(MainActivity.this);
builder.setTitle("Exit application");
builder.setMessage("Do you want to exit?");
builder.setPositiveButton("Yes", new DialogInterface.OnClickListener() {
@Override
public void onClick(DialogInterface dialog, int which) {
MainActivity.this.finish();
}
});

builder.setNegativeButton("No", new DialogInterface.OnClickListener() {
@Override
public void onClick(DialogInterface dialog, int which) {
dialog.cancel();
}
});

builder.setCancelable(false);
AlertDialog myDialog = builder.create();
myDialog.show();
}
});
}

@Override
public boolean onCreateOptionsMenu(Menu menu) {
// Inflate the menu; this adds items to the action bar if it is present.
getMenuInflater().inflate(R.menu.activity_main, menu);
return true;
}

}
The results look like this:

Thanks for reading!
Subscribe to:
Post Comments (Atom)
No comments:
Post a Comment
Note: Only a member of this blog may post a comment.