Saturday, January 31, 2015
Arc Mobile Prime 350 350D Hard Reset Hang Google Account Removal Pattern Lock
Before you proceed flashing / hard resetting your phone / tablet make sure to back up your important files if possible. Because we care about your data.
We also suggest that your battery should be atleast 50% or better to have it fully charge, lower than the said value may cause unwanted result, such as bricking your phone / tablet rendering it unuseable. This is very important in flashing your phone / tablet. Use original USB cable as possible.
Files that you downloaded should not be corrupted, if ever the file is corrupted you might brick your phone. Or the flashing will start.
Drivers are very important specially in Spreadtrum Chipset, having an Spreadtrum SPD6610 (non android devices) driver will not work in SPD6820 (android devices).
If you are using laptop to flash your phone, make your that it has enough charge. If your laptop shutdown when your flashing your phone/tablet, youll end up bricking your phone. Sometimes you can still recover your phone just flash it again and your phone will boot up again. But that is just a case to case basis, if your phone / tablet is deadboot (totally dead, erased all program in the chip) you cant recover it, you will need to seek professional help (technician).
In this tutorial I will gonna teach you how to hard reset your Arc Mobile Prime 350/350D Hard Reset. This can fix the following issues that you are experiencing in your phone:
1. Force Close Apps
2. If you forgot your Google Account
3. Hang in Logo (sometimes
4. Pattern Lock

Ok lets do it. Just follow the procedure
- Press and hold volume DOWN and Power Button (You must press the power button first for 2 seconds then immediately press the volume DOWN)
- Android System Recovery will appear
- Navigate to wipe data/factory reset (to navigate press volume DOWN, to select press Volume UP)
- Select Yes – delete all user data (to navigate press volume DOWN, to select press Volume UP)
- Reboot your phone
Thats it your phone is back in its original state.
Dreamweaver Complete Tutorials in Urdu Hindi

Dreamweaver has become one of the industrys leading Web site design editing and management tool. This course is designed for students who wish to evaluate the Dreamweaver Web design tool or who would like to learn to use it. The emphasis is on learning to use Dreamweaver as a tool to create a Web site, rather than on learning the basic concepts of Web design and we move very quickly. However, all questions about basic Web design concepts will be answered.
Important First Considerations:
If you are new to Dreamweaver it is important to understand the use of the term site. Dreamweaver makes reference to two sites:
1: Remote Site - This is the folder or directory which contains all of your web pages and other files on the web server. It is the place to which you upload. If you school does not yet have a web page the folder or directory will be empty. However, as soon as you are given a username and password by the site webmaster, you have a remote site - your empty folder or directory.
2: Local Folder - This is the folder or directory which contains all of your web pages and other files on your computer. Dreamweaver also refers to this folder as a site.
Plan your Local Site:
1: Your first step in using Dreamweaver to build your site is to create a directory or folder. Plan to store all documents related to your site in the same directory; images, web pages, and any other documents that will be posted on your remote site.
2: Before going any further, create a directory or folder on the computer you will be using most often to update your web site. Create a sub-directory for your images. Now you are ready to " define your site ."
Video Tutorials for learning Dreamweaver:-
Here is the complete course of Dreamweaver. This is a playlist of videos straight from my YouTube channel, so you can watch all the videos by playing only the first one. This course is with full sorting, so you can watch the videos in order.
Dreamweaver CS3 (60 Videos)
Dreamweaver CS5 (62 Videos)
Dreamweaver CS6 (64 Videos)
Note: all videos are hosted on YouTube.com, so if you are in Pakistan then first open YouTube and then watch these videos, however, I’m trying to upload the videos to any other site so you’ll be able to watch all of them here.
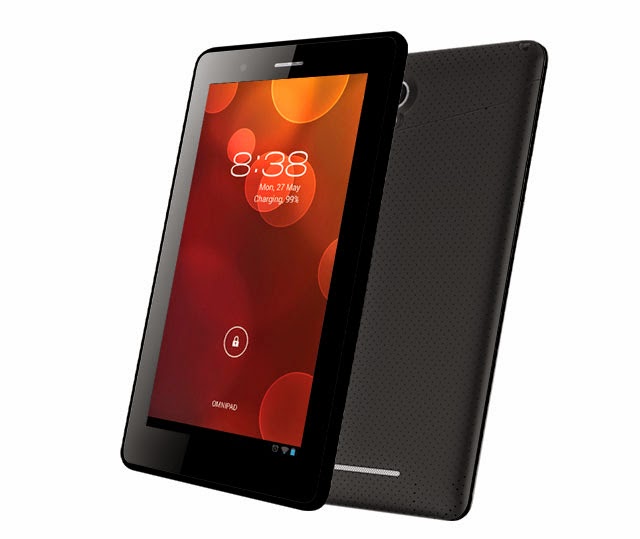
Neo Omnipad A74 Stock ROM Alternative ROM Pattern Lock Google Account Removal Flashing
Before you proceed flashing / hard resetting your phone / tablet make sure to back up your important files if possible. Because we care about your data.
We also suggest that your battery should be atleast 50% or better to have it fully charge, lower than the said value may cause unwanted result, such as bricking your phone / tablet rendering it unuseable. This is very important in flashing your phone / tablet. Use original USB cable as possible.
Files that you downloaded should not be corrupted, if ever the file is corrupted you might brick your phone. Or the flashing will start.
Drivers are very important specially in Spreadtrum Chipset, having an Spreadtrum SPD6610 (non android devices) driver will not work in SPD6820 (android devices).
If you are using laptop to flash your phone, make your that it has enough charge. If your laptop shutdown when your flashing your phone/tablet, youll end up bricking your phone. Sometimes you can still recover your phone just flash it again and your phone will boot up again. But that is just a case to case basis, if your phone / tablet is deadboot (totally dead, erased all program in the chip) you cant recover it, you will need to seek professional help (technician).
The tools and firmware are already included in the file that I will provide.
This tutorial fix the following issues in your tablet:
1. Google Account Lock up Removal
2. Pattern Lock Removal - this is the alternative way if the usb debuging mode is not activated in the settings
3. Hang in Android Logo
4. Bootloop
5. Forced Close Applications
6. Accidentally deleted systemUI
4. Bootloop
5. Forced Close Applications
6. Accidentally deleted systemUI
OK lets proceed.
1. Download the firmware and tool here --- >>> Firmware Tool
2. If you are done, extract it and install first the Pad Firmware Upgrader which is located in Pad end user upgradev1.01, It has already the driver when you install the software for flashing. Run setup.exe to install it.
3. Connect your tablet to the PC, your tablet should be power off, wait for the driver to install.
4. Open Pad Firmware Upgrade, Start>All Programs>Actions Tools
5. Click the green icon
6. Then juli.fw which is the firmware
7. Then press upgrade button. And connect your tablet in your PC.
Note: Driver is already included in the Pad Firmware Upgrade Tool, just connect your tablet in your PC and that will automatically install the driver.
Wait for it until the progress bar reach 100%. Just wait patiently :) When its done flashing sometimes the tablet does not power up automatically. Just press the reset button at the back of the tablet. Or try pressing the power button for about 10 seconds.
I hope this tutorial helps. If you have any suggestions just drop a comment ;)
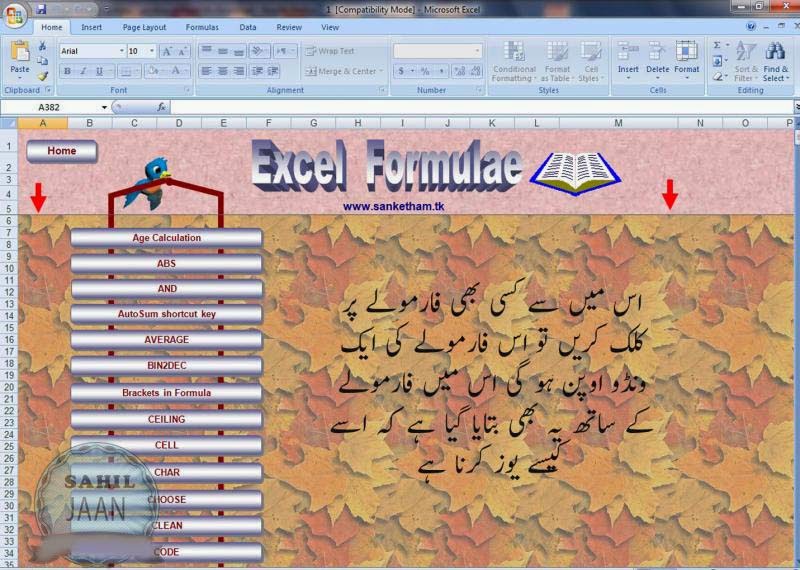
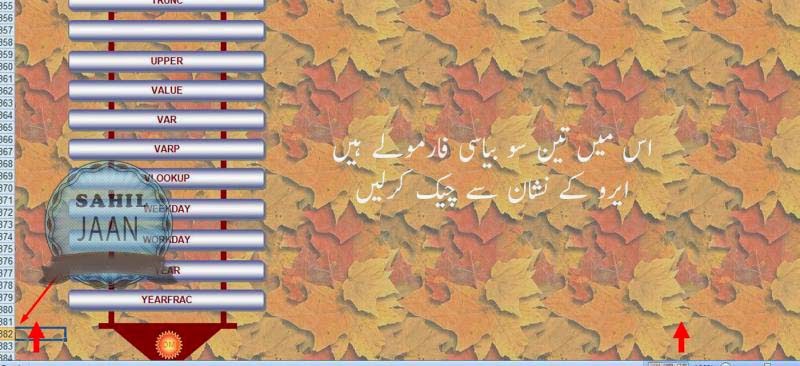
Excel ke 382 Farmulo ke Khazana Software

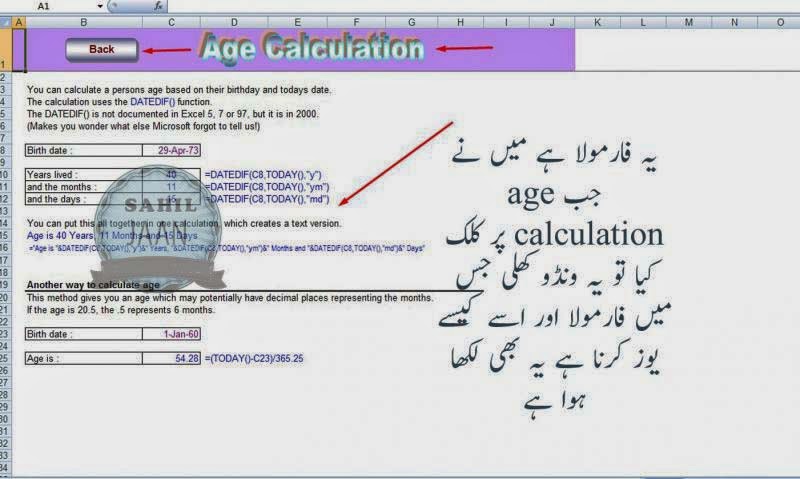
پیارے دوستــوآج میــں آپ کـی خـدمت میـں ایک ایســا ســافٹ وئیــر لــے کر آیا ہــوں جو ایکسل شیٹ پر ہی بنا یا گیا ہے ۔ جو ایکســل کے تین ســو بیاسی فارمولے اپنے اندر سموئے ہوئے ہے اس میں ہر قسم کا فارمولا موجود ہے جو ایک ایکسل یوزر کو ضرورت ہوتا ہے اس میں موجود کسی بھی فارمولے کے نام پر کلک کریں تو ایک ونڈو اوپن ہو گی جس میں وہ فارمولا اور اس فارمولے کو کیسے یوز کرنا ہے یہ بھی لکھا ہوگا تاکہ کوئی بھی یوزر اس فارمولے کو یوز کرنے کےلیے پریشانی کا شکار نہ ہو
ایک بہت ضرور ی اور اہم بات وہ یہ ہے کہ جب کسی فارمولے پر کلک کرنے سے جو ونڈو کھلے گی جس میں فارمولا لکھا ہو گا اگر آپ چاہے کہ یہ فارمولا الگ سے آپ کے پاس سیو ہو جائے تو اس کو
save
کرنے کی بجائے آپ اس فارمولے کو
save as
کریں گے تاکہ یہ الگ سے ایک فائل کی صورت میں آپ کے پاس سیو ہو جائے ورنہ یہ اسی سافٹ وئیر پر سیو ہو جائے گا
امید کرتا ہوں کہ یہ سافٹ وئیر آپ کو بہت پسند آئے گا
سافٹ وئیر کا نام: ایکسل فارمولا
DOWNLOAD
iconBIT Nettab Matrix II Tablet Android Firmware upgrade
iconBIT NetTab Matrix II , 7 inch Tablet Android , Firmware ,Support , Specifications
Review:
The Nettab Matrix II Tablet has all the stunning feature like other well named Android Tablets. Carrying Android 4x ICS with faster dual core processor and IGB RAM. The Tablet quality is good , updates are available , Tabet Support forums and service center is updated as well. In my opinion iconBIT NETTAB Tablets are in the category of best buying options.
read more about iconBIT company
Tablet Specifications:Company Profile iconBIT
read more about iconBIT company
LCD | 7" Capacitive Touch Screen |
Screen Resolution | 1024 x 600 Pix |
Processor | 1.5GHz Dual-Core Cortex A9 |
Chipset / Boxchip | Rockchip |
RAM | 1024 MB DDR3 |
Built in Memory | 8 GB |
External Memory | Support Micro Card (MAX 32GB) |
Network | 802.11 b/g/n WIFI , usb 3g Dongle supported |
Bluetooth | N/A |
GSM | N/A |
Camera | 2.0 Megapixel front |
HDMI | Supported |
Speaker / Mic | Mic Built IN |
Weight | 323 g |
Android OS | 4.0 ICS |
You can restore your tablets with following firmwares in following situations .
1. Forgotten Pattern Lock .
2.Too many pattern attempts / Reset user lock.
3. Tablets PC stuck on Gmail account.
4. Android Tablets PC stuck on Android logo.
5. Tablet Android hang on startup / Multiple errors generating by OS.
6. Google play store having problems or generating errors.
7.Upgrading to new Android OS.
6. Google play store having problems or generating errors.
7.Upgrading to new Android OS.
you can use this Android Tablet firmware, ROM to restore your Android China tablets to generic firmwares or upgrades . Make sure to charge battery . Power failure during flashing may result dead or broken tablets.
Note : Flashing generic tablet firmware should be last option.
Flashing Tools:
Download RKbatch Tool
Tutorials :
You may also like to read : Flashing Tutorial for Rockchip
Flashing Tools:
Download RKbatch Tool
Tutorials :
You may also like to read : Flashing Tutorial for Rockchip
v4.0.3 (19.02.2013) Android Rom
v4.0.3 (23.07.2012) Android Rom
v4.0.3 (23.07.2012) Android Rom
Other NETTAB Tablets Updates
NETTAB PARUS qUAD
NETTAB SPACE QUAD RX
NETTAB SKAT 3G QUAD
NETTAB SKY II
NETTAB SKY 3G DUO
NETTAB MATRIX ULTRA
NETTAB POCKET
NETTAB SPACE MX
NETTAB THOR X
NETTAB SKY II
NETTAB SKY 3G DUO
NETTAB MATRIX ULTRA
NETTAB POCKET
NETTAB SPACE MX
NETTAB THOR X
Creating a Flex AIR text editor Part 30
In this tutorial we will start working on the printing feature.
Go to the Declarations tags and add the Print menu item there:
Find the printing icon button on the toolbar and set its click property to a doPrint() function:
Now find the menuSelect function and add a check for the Print label here, which also calls the doPrint() function:
The doPrint() function is where it gets complicated. For now, we are just going to have it create a FlexPrintJob object and pass a tempText text area object for it to print. Before we do that, we need to create the tempText object:
The doPrint function:
Full code:
Thanks for reading!
Read more »
Go to the Declarations tags and add the Print menu item there:
<fx:XML id="windowMenu">
<root>
<menuitem label="File">
<menuitem label="New" key="n" controlKey="true" />
<menuitem label="Open" key="o" controlKey="true" />
<menuitem type="separator"/>
<menuitem label="Print" key="p" controlKey="true" />
</menuitem>
<menuitem label="Edit">
<menuitem label="Cut" key="x" controlKey="true" />
<menuitem label="Copy" key="c" controlKey="true" />
<menuitem label="Paste" key="v" controlKey="true" />
<menuitem type="separator"/>
<menuitem label="Select all" key="a" controlKey="true" />
</menuitem>
<menuitem label="Settings">
<menuitem label="Word wrap" type="check" toggled="{pref_wrap}" />
<menuitem label="Font..."/>
</menuitem>
<menuitem label="View">
<menuitem label="Tool bar" type="check" toggled="{pref_toolbar}" />
<menuitem label="Status bar" type="check" toggled="{pref_status}" />
<menuitem label="Line count" type="check" toggled="{pref_linecount}" />
<menuitem label="Side pane" type="check" toggled="{pref_sidepane}" />
</menuitem>
</root>
</fx:XML>
Find the printing icon button on the toolbar and set its click property to a doPrint() function:
<custom:IconButton icon="@Embed(../lib/printer.png)" toolTip="Print" click="doPrint();" />
Now find the menuSelect function and add a check for the Print label here, which also calls the doPrint() function:
private function menuSelect(evt:FlexNativeMenuEvent):void {
(evt.item.@label == "New")?(doNew()):(void);
(evt.item.@label == "Word wrap")?(pref_wrap = !pref_wrap):(void);
(evt.item.@label == "Cut")?(doCut()):(void);
(evt.item.@label == "Copy")?(doCopy()):(void);
(evt.item.@label == "Paste")?(doPaste()):(void);
(evt.item.@label == "Select all")?(doSelectall()):(void);
(evt.item.@label == "Status bar")?(pref_status = !pref_status):(void);
(evt.item.@label == "Tool bar")?(pref_toolbar = !pref_toolbar):(void);
(evt.item.@label == "Side pane")?(pref_sidepane = !pref_sidepane):(void);
(evt.item.@label == "Line count")?(pref_linecount = !pref_linecount):(void);
(evt.item.@label == "Font...")?(doFont()):(void);
(evt.item.@label == "Print")?(doPrint()):(void);
savePreferences();
updateStatus();
if (pref_wrap) {
pref_linecount = false;
}
updateTextSize();
countLines();
}
The doPrint() function is where it gets complicated. For now, we are just going to have it create a FlexPrintJob object and pass a tempText text area object for it to print. Before we do that, we need to create the tempText object:
<s:TextArea id="tempText" borderVisible="false" visible="false"/>
The doPrint function:
private function doPrint():void {
var printJob:FlexPrintJob = new FlexPrintJob();
if (!printJob.start()) return;
tempText.visible = true;
tempText.setStyle("lineBreak", "toFit");
tempText.text = textArea.text;
tempText.width = printJob.pageWidth;
tempText.heightInLines = NaN;
tempText.setStyle("horizontalScrollPolicy", "off");
tempText.setStyle("verticalScrollPolicy", "off");
printJob.printAsBitmap = false;
printJob.addObject(tempText, "matchWidth");
printJob.send();
tempText.visible = false;
}
Full code:
<?xml version="1.0" encoding="utf-8"?>
<s:WindowedApplication xmlns:fx="http://ns.adobe.com/mxml/2009"
                       xmlns:s="library://ns.adobe.com/flex/spark"
                       xmlns:mx="library://ns.adobe.com/flex/mx"
   xmlns:custom="*"
   creationComplete="init();" title="Kirpad" showStatusBar="{pref_status}"
   minWidth="400" minHeight="200" height="700" width="900">

<s:menu>
<mx:FlexNativeMenu dataProvider="{windowMenu}" showRoot="false" labelField="@label" keyEquivalentField="@key" itemClick="menuSelect(event);" />
</s:menu>

<fx:Script>
<![CDATA[
import flash.events.KeyboardEvent;
import flash.events.Event;
import flash.events.MouseEvent;
import flash.events.NativeWindowBoundsEvent;
import flash.net.SharedObject;
import flashx.textLayout.accessibility.TextAccImpl;
import mx.collections.ArrayCollection;
import mx.controls.Alert;
import mx.controls.TextArea;
import mx.events.FlexNativeMenuEvent;
import flashx.textLayout.elements.TextFlow;
import flashx.textLayout.elements.Configuration;
import flash.system.System;
import flash.desktop.Clipboard;
import flash.desktop.ClipboardFormats;
import flash.ui.Mouse;
import mx.events.CloseEvent;
import flash.ui.ContextMenu;
import flash.ui.ContextMenuItem;
import flash.events.ContextMenuEvent;
import mx.events.ResizeEvent;
import mx.core.FlexGlobals;
import mx.printing.FlexPrintJob;
import mx.printing.FlexPrintJobScaleType;

private var preferences:SharedObject = SharedObject.getLocal("kirpadPreferences");
[Bindable]
private var pref_wrap:Boolean = true;
[Bindable]
private var pref_status:Boolean = true;
[Bindable]
private var pref_toolbar:Boolean = true;
[Bindable]
private var pref_sidepane:Boolean = true;
[Bindable]
private var pref_linecount:Boolean = true;
[Bindable]
public var pref_fontsettings:Object = new Object();

private var initHeight:Number;
private var heightFixed:Boolean = false;

private var statusMessage:String;
[Bindable]
private var textHeight:Number;
[Bindable]
private var textWidth:Number;
[Bindable]
private var textY:Number;
[Bindable]
private var textX:Number;
[Bindable]
private var tabY:Number;
[Bindable]
private var sidePaneY:Number;
[Bindable]
private var sidePaneX:Number;
[Bindable]
private var sidePaneHeight:Number;
[Bindable]
private var sidePaneWidth:Number = 180;
[Bindable]
private var sideContentWidth:Number = 170;
[Bindable]
private var tabWidth:Number;
[Bindable]
private var lineCountWidth:Number = 40;
[Bindable]
private var lineNumbers:String = "1";
[Bindable]
private var lineDisplayedNum:int = 1;

[Bindable]
private var tabSelectedIndex:int = 0;

private var previousIndex:int = 0;
private var rightclickTabIndex:int = 0;
private var untitledNum:int = 0;
private var tabsToClose:int = 0;
private var closeAfterConfirm:Boolean = false;

public var fontWindow:FontWindow = new FontWindow();

private function init():void {
// Create a listener for every frame
addEventListener(Event.ENTER_FRAME, everyFrame);

// Set initHeight to the initial height value on start
initHeight = height;

// Set preferences if loaded for the first time
if (preferences.data.firsttime == null) {
preferences.data.firsttime = true;
preferences.data.wrap = false;
preferences.data.status = true;
preferences.data.toolbar = true;
preferences.data.sidepane = true;
preferences.data.linecount = true;
preferences.data.fontsettings = {fontfamily:"Lucida Console", fontsize:14, fontstyle:"normal", fontweight:"normal", fontcolor:0x000000, bgcolor:0xffffff};
preferences.flush();
}

// Set preferences loaded from local storage
pref_wrap = preferences.data.wrap;
pref_status = preferences.data.status;
pref_toolbar = preferences.data.toolbar;
pref_sidepane = preferences.data.sidepane;
pref_fontsettings = preferences.data.fontsettings;
pref_linecount = preferences.data.linecount;

// Allow insertion of tabs
var textFlow:TextFlow = textArea.textFlow;
var config:Configuration = Configuration(textFlow.configuration);
config.manageTabKey = true;

// Set status message
statusMessage = "[ " + new Date().toLocaleTimeString() + " ] Kirpad initialized";
updateStatus();

// Close all sub-windows if main window is closed
addEventListener(Event.CLOSING, onClose);

// Add listener for the event that is dispatched when new font settings are applied
fontWindow.addEventListener(Event.CHANGE, fontChange);

// Update real fonts with the data from the settings values
updateFonts();

// Create a listener for resizing
addEventListener(NativeWindowBoundsEvent.RESIZE, onResize);

// Context menu declaration for the tabbar control
var cm_close:ContextMenuItem = new ContextMenuItem("Close tab");
cm_close.addEventListener(ContextMenuEvent.MENU_ITEM_SELECT, tabContextClose);
var cm_closeother:ContextMenuItem = new ContextMenuItem("Close other tabs");
cm_closeother.addEventListener(ContextMenuEvent.MENU_ITEM_SELECT, tabContextCloseOther);

var cm:ContextMenu = new ContextMenu();
cm.items = [cm_close, cm_closeother];
cm.hideBuiltInItems();
tabBar.contextMenu = cm;
tabBar.addEventListener(MouseEvent.RIGHT_MOUSE_DOWN, tabRightClick);

// Context menu declaration for the tab management list control
sideList.contextMenu = cm;
sideList.addEventListener(MouseEvent.RIGHT_MOUSE_DOWN, listRightClick);

// Listen to keyboard
addEventListener(KeyboardEvent.KEY_DOWN, onKeyDown);
}

private function menuSelect(evt:FlexNativeMenuEvent):void {
(evt.item.@label == "New")?(doNew()):(void);
(evt.item.@label == "Word wrap")?(pref_wrap = !pref_wrap):(void);
(evt.item.@label == "Cut")?(doCut()):(void);
(evt.item.@label == "Copy")?(doCopy()):(void);
(evt.item.@label == "Paste")?(doPaste()):(void);
(evt.item.@label == "Select all")?(doSelectall()):(void);
(evt.item.@label == "Status bar")?(pref_status = !pref_status):(void);
(evt.item.@label == "Tool bar")?(pref_toolbar = !pref_toolbar):(void);
(evt.item.@label == "Side pane")?(pref_sidepane = !pref_sidepane):(void);
(evt.item.@label == "Line count")?(pref_linecount = !pref_linecount):(void);
(evt.item.@label == "Font...")?(doFont()):(void);
(evt.item.@label == "Print")?(doPrint()):(void);
savePreferences();
updateStatus();
if (pref_wrap) {
pref_linecount = false;
}
updateTextSize();
countLines();
}

private function savePreferences():void {
preferences.data.wrap = pref_wrap;
preferences.data.status = pref_status;
preferences.data.toolbar = pref_toolbar;
preferences.data.fontsettings = pref_fontsettings;
preferences.data.sidepane = pref_sidepane;
preferences.data.linecount = pref_linecount;
preferences.flush();
}

private function doCut():void {
var selectedText:String = textArea.text.substring(textArea.selectionActivePosition, textArea.selectionAnchorPosition);
System.setClipboard(selectedText);
insertText("");
}

private function doCopy():void {
var selectedText:String = textArea.text.substring(textArea.selectionActivePosition, textArea.selectionAnchorPosition);
System.setClipboard(selectedText);
}

private function doPaste():void{
var myClip:Clipboard = Clipboard.generalClipboard;
var pastedText:String = myClip.getData(ClipboardFormats.TEXT_FORMAT) as String;
insertText(pastedText);
}

private function doSelectall():void {
textArea.selectAll();
}

private function insertText(str:String):void {
var substrPositions:int = textArea.selectionActivePosition - textArea.selectionAnchorPosition;
var oldSel1:int = (substrPositions>0)?(textArea.selectionAnchorPosition):(textArea.selectionActivePosition);
var oldSel2:int = (substrPositions<0)?(textArea.selectionAnchorPosition):(textArea.selectionActivePosition);
var preText:String = textArea.text.substring(0, oldSel1);
var postText:String = textArea.text.substring(oldSel2);
var newSelectRange:int = preText.length + str.length;
textArea.text = preText + str + postText;
textArea.selectRange(newSelectRange, newSelectRange);
}

private function cursorFix():void{
Mouse.cursor = "ibeam";
}

private function everyFrame(evt:Event):void {
if (!heightFixed && height==initHeight) {
height = initHeight - 20;
if (height != initHeight) {
heightFixed = true;
updateTextSize();
}
}
updateLineScroll();
}

private function onResize(evt:ResizeEvent):void {
updateTextSize();
}

private function updateTextSize():void {
tabY = (toolBar.visible)?(toolBar.height):(0);
textX = (pref_linecount)?(lineCountWidth):(0);
var statusHeight:Number = (pref_status)?(statusBar.height):(0);
textWidth = (pref_sidepane)?(width - sidePaneWidth - textX):(width - textX);
tabWidth = textWidth + textX;
var tabbarScrollHeight:Number = (tabData.length * 170 > tabWidth)?(15):(0);
textY = tabBar.height + tabY + tabbarScrollHeight;
textHeight = height - textY - statusHeight;
focusManager.setFocus(textArea);
sidePaneHeight = textHeight + tabBar.height + tabbarScrollHeight;
sidePaneY = textY - tabBar.height - tabbarScrollHeight;
sidePaneX = width - sidePaneWidth;
}

private function updateStatus():void {
var str:String = new String();
str = (pref_wrap)?("Word wrapping on"):(caretPosition());
status = str + "	" + statusMessage;
}

private function caretPosition():String {
var pos:int = textArea.selectionActivePosition;
var str:String = textArea.text.substring(0, pos);
var lines:Array = str.split("
");
var line:int = lines.length;
var col:int = lines[lines.length - 1].length + 1;

return "Ln " + line + ", Col " + col;
}

private function doFont():void{
fontWindow.open();
fontWindow.activate();
fontWindow.visible = true;
fontWindow.setValues(pref_fontsettings.fontsize, pref_fontsettings.fontfamily, pref_fontsettings.fontstyle, pref_fontsettings.fontweight, pref_fontsettings.fontcolor, pref_fontsettings.bgcolor);
}

private function onClose(evt:Event):void {
if(!closeAfterConfirm){
evt.preventDefault();
var allWindows:Array = NativeApplication.nativeApplication.openedWindows;
for (var i:int = 1; i < allWindows.length; i++)
{
allWindows[i].close();
}

// Check if there are any unsaved tabs
var needSaving:Boolean = false;
tabsToClose = 0;

for (var u:int = 0; u < tabData.length; u++) {
if (tabData[u].saved == false) {
needSaving = true;
tabsToClose++;
}
}

// If there are unsaved tabs, dont close window yet, set closeAfterConfirm to true and close all tabs
if (needSaving) {
closeAfterConfirm = true;
for (var t:int = 0; t < tabData.length; t++) {
closeTab(t);
}
}
if (!needSaving) {
FlexGlobals.topLevelApplication.close();
}
}
}

private function fontChange(evt:Event):void{
pref_fontsettings.fontfamily = fontWindow.fontCombo.selectedItem.fontName;
pref_fontsettings.fontsize = fontWindow.sizeStepper.value;

if (fontWindow.styleCombo.selectedIndex == 0) {
pref_fontsettings.fontstyle = "normal";
pref_fontsettings.fontweight = "normal";
}
if (fontWindow.styleCombo.selectedIndex == 1) {
pref_fontsettings.fontstyle = "italic";
pref_fontsettings.fontweight = "normal";
}
if (fontWindow.styleCombo.selectedIndex == 2) {
pref_fontsettings.fontstyle = "normal";
pref_fontsettings.fontweight = "bold";
}
if (fontWindow.styleCombo.selectedIndex == 3) {
pref_fontsettings.fontstyle = "italic";
pref_fontsettings.fontweight = "bold";
}

pref_fontsettings.fontcolor = fontWindow.colorPicker.selectedColor;
pref_fontsettings.bgcolor = fontWindow.bgColorPicker.selectedColor;

savePreferences();
updateFonts();
}

private function updateFonts():void{
textArea.setStyle("fontFamily", pref_fontsettings.fontfamily);
textArea.setStyle("fontSize", pref_fontsettings.fontsize);
textArea.setStyle("fontStyle", pref_fontsettings.fontstyle);
textArea.setStyle("fontWeight", pref_fontsettings.fontweight);
textArea.setStyle("color", pref_fontsettings.fontcolor);
textArea.setStyle("contentBackgroundColor", pref_fontsettings.bgcolor);

lineCount.setStyle("fontFamily", pref_fontsettings.fontfamily);
lineCount.setStyle("fontSize", pref_fontsettings.fontsize);
lineCount.setStyle("fontStyle", pref_fontsettings.fontstyle);
lineCount.setStyle("fontWeight", pref_fontsettings.fontweight);
lineCount.setStyle("color", pref_fontsettings.fontcolor);
lineCount.setStyle("contentBackgroundColor", pref_fontsettings.bgcolor);
}

private function onTabClose(evt:Event):void {
var tabWidth:Number = tabBar.width / tabData.length;
var cIndex:int = Math.floor(tabBar.mouseX / tabWidth);
tabSelectedIndex = cIndex;
tabChange();
closeTab(tabSelectedIndex);
}

private function onListClose(evt:Event):void {
tabSelectedIndex = sideList.selectedIndex;
tabChange();
closeTab(tabSelectedIndex);
}

private function closeTab(index:int):void {
if (tabData[index].saved) {
removeTab(index);
}
if (!tabData[index].saved) {
Alert.show("Save " + tabData[index].title + " before closing?", "Confirmation", Alert.YES | Alert.NO, null, confirmClose);
}
function confirmClose(evt:CloseEvent):void {
tabsToClose--;
if (evt.detail == Alert.YES) {
// TODO: call saving function here
removeTab(index);
}else {
removeTab(index);
}
}
}

private function removeTab(index:int):void {
// if this is the last tab, create a new empty tab
if (tabData.length == 1) {
tabData.addItem( { title:"Untitled", textData:"", saved:false } );
}
statusMessage = "[ " + new Date().toLocaleTimeString() + " ] Tab closed: " + tabData[index].title;
updateStatus();
tabData.removeItemAt(index);
tabSelectedIndex = tabBar.selectedIndex;
previousIndex = tabSelectedIndex;
textArea.text = tabData[tabSelectedIndex].textData;
textArea.selectRange(tabData[tabSelectedIndex].selectedAnchor, tabData[tabSelectedIndex].selectedActive);
if (closeAfterConfirm && tabsToClose == 0) {
FlexGlobals.topLevelApplication.close();
}
countLines();
updateTextSize();
}

private function doNew():void {
statusMessage = "[ " + new Date().toLocaleTimeString() + " ] New tab created";
updateStatus();
untitledNum++;
tabData.addItem( { title:"Untitled("+untitledNum+")", textData:"", saved:false } );
tabSelectedIndex = tabData.length - 1;
tabChange();
updateTextSize();
}

private function tabChange(from:String = "none"):void {
if (from == "tabbar") {
tabSelectedIndex = tabBar.selectedIndex;
}
if (from == "sidelist") {
tabSelectedIndex = sideList.selectedIndex;
}
tabData[previousIndex].textData = textArea.text;
tabData[previousIndex].selectedActive = textArea.selectionActivePosition;
tabData[previousIndex].selectedAnchor = textArea.selectionAnchorPosition;
previousIndex = tabSelectedIndex;
textArea.text = tabData[tabSelectedIndex].textData;
textArea.selectRange(tabData[tabSelectedIndex].selectedAnchor, tabData[tabSelectedIndex].selectedActive);
updateStatus();
countLines();
}

private function tabContextClose(evt:ContextMenuEvent):void{
closeTab(rightclickTabIndex);
}

private function tabContextCloseOther(evt:ContextMenuEvent):void {
var len:int = tabData.length;
for (var i:int = 0; i < len; i++) {
if (i != rightclickTabIndex) {
closeTab(i);
}
}
}

private function tabRightClick(evt:MouseEvent):void {
var tabWidth:Number = tabBar.width / tabData.length;
var rcIndex:int = Math.floor(tabBar.mouseX / tabWidth);
rightclickTabIndex = rcIndex;
}

private function listRightClick(evt:MouseEvent):void {
var tabHeight:Number = 20;
var rcIndex:int = Math.floor((sideList.mouseY + sideList.scroller.verticalScrollBar.value) / tabHeight);
rightclickTabIndex = rcIndex;
}

private function onKeyDown(evt:KeyboardEvent):void{
if (evt.ctrlKey) {
// Ctrl+TAB - next tab
if (evt.keyCode == 9 && !evt.shiftKey) {
if (tabData.length - tabSelectedIndex > 1) {
tabSelectedIndex++;
tabChange();
}
}
// Ctrl+Shift+TAB - previous tab
if (evt.keyCode == 9 && evt.shiftKey) {
if (tabSelectedIndex > 0) {
tabSelectedIndex--;
tabChange();
}
}
// Ctrl+number (1-8) - go to numbered tab
if (evt.keyCode >= 49 && evt.keyCode <= 56) {
var num:int = evt.keyCode - 48;
if (tabData.length > num - 1) {
tabSelectedIndex = num - 1;
tabChange();
}
}
// Ctrl+9 - go to last tab
if (evt.keyCode == 57) {
tabSelectedIndex = tabData.length - 1;
tabChange();
}
}
}

private function closeSidePane():void{
pref_sidepane = !pref_sidepane
savePreferences();
updateTextSize();
}

private function countLines():void {
if (pref_linecount && !pref_wrap) {
var totalLines:int = textArea.text.split("
").length;
if (totalLines != lineDisplayedNum) {
updateTextSize();
updateLineCount(totalLines, totalLines-lineDisplayedNum, lineDisplayedNum);
lineDisplayedNum = totalLines;
}
}
}

private function updateLineCount(total:int, difference:int, current:int):void {
if (difference > 0) {
for (var i:int = current + 1; i < (total+1); i++) {
lineNumbers += "
" + (i);
}
}
if (difference < 0) {
var charsInTheEnd:int = 0;
for (var u:int = 0; u < -difference; u++) {
charsInTheEnd += ((current - u).toString().length + 1);
}
lineNumbers = lineCount.text.substring(0, lineCount.text.length - charsInTheEnd);
}
}

private function updateLineScroll():void{
lineCount.scroller.verticalScrollBar.value = textArea.scroller.verticalScrollBar.value;
}

private function doPrint():void {
var printJob:FlexPrintJob = new FlexPrintJob();
if (!printJob.start()) return;
tempText.visible = true;
tempText.setStyle("lineBreak", "toFit");
tempText.text = textArea.text;
tempText.width = printJob.pageWidth;
tempText.heightInLines = NaN;
tempText.setStyle("horizontalScrollPolicy", "off");
tempText.setStyle("verticalScrollPolicy", "off");
printJob.printAsBitmap = false;
printJob.addObject(tempText, "matchWidth");
printJob.send();
tempText.visible = false;
}
]]>
</fx:Script>

<fx:Declarations>
<fx:XML id="windowMenu">
<root>
<menuitem label="File">
<menuitem label="New" key="n" controlKey="true" />
<menuitem label="Open" key="o" controlKey="true" />
<menuitem type="separator"/>
<menuitem label="Print" key="p" controlKey="true" />
</menuitem>
<menuitem label="Edit">
<menuitem label="Cut" key="x" controlKey="true" />
<menuitem label="Copy" key="c" controlKey="true" />
<menuitem label="Paste" key="v" controlKey="true" />
<menuitem type="separator"/>
<menuitem label="Select all" key="a" controlKey="true" />
</menuitem>
<menuitem label="Settings">
<menuitem label="Word wrap" type="check" toggled="{pref_wrap}" />
<menuitem label="Font..."/>
</menuitem>
<menuitem label="View">
<menuitem label="Tool bar" type="check" toggled="{pref_toolbar}" />
<menuitem label="Status bar" type="check" toggled="{pref_status}" />
<menuitem label="Line count" type="check" toggled="{pref_linecount}" />
<menuitem label="Side pane" type="check" toggled="{pref_sidepane}" />
</menuitem>
</root>
</fx:XML>
<mx:ArrayCollection id="tabData">
<fx:Object title="Untitled" textData="" saved="false" seletedActive="0" selectedAnchor="0" />
</mx:ArrayCollection>
<mx:ArrayCollection id="sidePaneData">
<fx:Object icon="@Embed(../lib/page.png)" tip="Tab management" />
<fx:Object icon="@Embed(../lib/folder_magnify.png)" tip="File browsing" />
<fx:Object icon="@Embed(../lib/book.png)" tip="Snippets" />
</mx:ArrayCollection>
<mx:ArrayCollection id="sidePaneTabHeadings">
<fx:String>Tab management</fx:String>
<fx:String>File browsing</fx:String>
<fx:String>Snippets</fx:String>
</mx:ArrayCollection>
</fx:Declarations>

<s:Group width="100%" height="100%">
<s:TextArea id="textArea" width="{textWidth}" height="{textHeight}" y="{textY}" x="{textX}" lineBreak="{(pref_wrap)?(toFit):(explicit)}"  click="cursorFix(); updateStatus();" change="updateStatus(); countLines();" keyDown="updateStatus();" borderVisible="false" focusThickness="0" />
<s:Scroller horizontalScrollPolicy="auto" verticalScrollPolicy="off" width="{tabWidth}" y="{tabY}">
<s:Group>
<custom:CustomTabBar id="tabBar" dataProvider="{tabData}" itemRenderer="CustomTab" height="22" tabClose="onTabClose(event);" change="tabChange(tabbar);" selectedIndex="{tabSelectedIndex}">
<custom:layout>
<s:HorizontalLayout gap="-1" columnWidth="170" variableColumnWidth="false"/>
</custom:layout>
</custom:CustomTabBar>
</s:Group>
</s:Scroller>
<s:TextArea id="lineCount" width="{lineCountWidth}" text="{lineNumbers}" visible="{pref_linecount}" height="{textHeight}" y="{textY}" editable="false" selectable="false" mouseEnabled="false" textAlign="right" verticalScrollPolicy="off" horizontalScrollPolicy="off" />
<mx:HBox id="toolBar" width="100%" backgroundColor="#dddddd" height="30" visible="{pref_toolbar}" paddingTop="2" paddingLeft="3">
<custom:IconButton icon="@Embed(../lib/page.png)" toolTip="New document" click="doNew();" />
<custom:IconButton icon="@Embed(../lib/folder_page.png)" toolTip="Open" />
<custom:IconButton icon="@Embed(../lib/disk.png)" toolTip="Save" />
<custom:IconButton icon="@Embed(../lib/disk_multiple.png)" toolTip="Save all" />
<custom:IconButton icon="@Embed(../lib/printer.png)" toolTip="Print" click="doPrint();" />
<s:Label text="|" fontSize="18" color="#bbbbbb" paddingTop="4" />
<custom:IconButton icon="@Embed(../lib/arrow_undo.png)" toolTip="Undo" />
<custom:IconButton icon="@Embed(../lib/arrow_redo.png)" toolTip="Redo" />
<s:Label text="|" fontSize="18" color="#bbbbbb" paddingTop="4" />
<custom:IconButton icon="@Embed(../lib/cut.png)" toolTip="Cut" click="doCut();" />
<custom:IconButton icon="@Embed(../lib/page_white_copy.png)" toolTip="Copy" click="doCopy();" />
<custom:IconButton icon="@Embed(../lib/paste_plain.png)" toolTip="Paste" click="doPaste();" />
</mx:HBox>
<mx:Box id="sidePane" width="{sidePaneWidth}" y="{sidePaneY}" x="{sidePaneX}" height="{sidePaneHeight}" backgroundColor="#dddddd" visible="{pref_sidepane}" paddingTop="5" paddingLeft="5" horizontalScrollPolicy="off">
<s:Group>
<s:Label text="{sidePaneTabHeadings.getItemAt(sidePaneButtons.selectedIndex)}" width="{sidePaneWidth}" />
<mx:Image source="@Embed(../lib/bullet_go.png)" top="-4" right="15" click="closeSidePane();" useHandCursor="true" buttonMode="true"/>
</s:Group>
<mx:ToggleButtonBar id="sidePaneButtons" dataProvider="{sidePaneData}" iconField="icon" width="{sidePaneWidth-10}" toolTipField="tip" />
<mx:ViewStack id="sidePaneStack" height="100%" selectedIndex="{sidePaneButtons.selectedIndex}">
<s:NavigatorContent id="tabs">
<custom:CustomList id="sideList" dataProvider="{tabData}" width="{sideContentWidth}" height="100%" itemRenderer="CustomListItem" selectedIndex="{tabSelectedIndex}" change="tabChange(sidelist);" tabClose="onListClose(event);" />
</s:NavigatorContent>
<s:NavigatorContent id="files">
<mx:FileSystemTree height="100%" width="100%" />
</s:NavigatorContent>
<s:NavigatorContent id="snippets">
<s:VGroup height="100%" width="100%">
<mx:Tree height="100%" width="100%" />
<s:Button width="100%" label="New snippet" />
<s:Button width="100%" label="Manage snippets" />
</s:VGroup>
</s:NavigatorContent>
</mx:ViewStack>
</mx:Box>
</s:Group>
<s:TextArea id="tempText" borderVisible="false" visible="false"/>

</s:WindowedApplication>
Thanks for reading!
How to Recover Data in Urdu Hindi Tutorials

 DATA RECOVERY
2.gif) The history of DATARECOVERY dates from 1991, when we first applied our experience with data processing toward the recovery of digital data. Subsequently, the growing demand for such ability led to the commitment of our services to data analysis, processing and recovery.
The history of DATARECOVERY dates from 1991, when we first applied our experience with data processing toward the recovery of digital data. Subsequently, the growing demand for such ability led to the commitment of our services to data analysis, processing and recovery. Data Recovery is not an easy task. Recovering critical data is a dedicated process that requires the right software, hardware and advanced methods in the hands of right recovery engineers. In order to save yourself from the problem of data lost, you must keep a backup of your important data. Backing up is the process of making and keeping copies of data at a desired destination, which may be used to restore the original in case of mishap of data loss. You should always keep multiple copies of files in data storage, so that if your original copy gets lost or damaged then you can easily get back your important file from backup.
Data loss may occur due to various reasons:
Accidentally deletion of files and folders
Human error
Physical damage of hard drive
Virus attack
System failure
Data is stored in Hard disk, an essential part of a computer system, which is also called HDD, Disk Drive, Hard Drive etc. If your hard disk is damaged, you will lose your data and you are left with one choice, that is, to repair the hard drive by de-fragmenting the operating system. It is possible that due to de-fragmentation some files gets overwritten and your problem may get higher. So, you need to be very careful. Data recovery software is an incomparable option in such a case. Hard drive recovery software can be used to perform recovery of data from any type of failure of hard drive such as crashed, damaged, corrupted, deleted, formatted and many more complex failures.
The experts of Hard drive data recovery will decide whether the problem is physical, logical or both. Physical problem occur in the hardware and logical problem occur on software configuration. Once it is decided that problem is physical then the accessibility of solution will be determined. If the hard drive data recovery experts obtain access to the drive, then they will create a sector by sector mirror image of the hard disk to their equipment where the process will continue. An assessment of the condition of the data structure will follow, as well as the identification of how much of the information is retrievable. When the hard drive data recovery assessment process is done, the results of the hard drive data recovery will be given.

Hard Reset Verizon Thunderbolt htc smartphone
How to Hard Reset Verizon Thunderbolt HTC Smartphone
What is Hard Reset ?
A hard reset is the factory reset is when you restore your device to state when it left the factory or first time the Smartphone or Tablets get started . Hard Reset erase all user setting,contents (i.e games,contacts,messages,Smartphones app preference setting ,bookmarks,third party apps as well .) So if youre enough lucky then you can make backup of all your data before hard reset .Different Android Devices have different method of Hard Reset.
When Hard Reset is Necessary for Smartphones or Tablets ?
1. Forgotten Pattern Lock on Android Tablets or Smartphones.
2.Too many pattern attempts / Reset user lock.
3. Tablets PC,Smartphones stuck on Gmail account.
4. Android Tablet PC stuck on Android logo.
5. Tablet Android or Smartphones hang on start-up / Multiple errors generating by OS.
6. Android Market having problems or generating errors.
7.Upgrading to new Android version.
6. Android Market having problems or generating errors.
7.Upgrading to new Android version.
Make sure to charge battery up to 60%.
 |
| Verizon Thunderbolt |
Hard Reset Method for Verizon Thunderbolt HTC Smartphone
- Turn off your smartphone
- Press and hold Volume Down button
- Press Power ON button .
- When Android Exclamation marks comes out
- Leave the power button but keep holding Volume down button.
- Use volume + (UP)and volume -(down) buttons to select the "Wipe data /Factory Reset".
- Confirm Using Power button (Power button = Enter )
- Select "Yes -- delete all user data "
- Allow some time for factory data reset.
- When done select "Reboot system now" and confirm using power button.
- It will take some time to complete reboot process .
Expressions and Operators in ActionScript 3
An expression is something that computes or evaluates into a single value. In a very simple form, a reference to a variable is already an expression. For example:
Here, the variable quantity evaluates to a value of 5.
An expression can also be made up of multiple values that are manipulated in some kind of operation. For example:
Here, we have two values: 10 and 5. The values in this expression are referred to as operands. These operands are going to be added together, as signified by the plus symbol. The plus symbol is referred to as the operator in this expression. Operators are special characters that are used to perform operations between values or operands. And once the operation in this example is complete, the expression evaluates to a value of 15.
Lets take a look at some of the operators you can use in ActionScript 3.
Arithmetic Operators
Examples:
The plus, minus, multiply, and divide operators are pretty self-explanatory. As for the Modulo operator, this will return the remainder from a division operation.
Example:
7 divided by 2 is equal to 3 remainder 1. A modulo operation will return the remainder, so 7 % 2 will return 1.
When performing an arithmetic operation on expressions that have more than two different operators, use parentheses to group the operands and operators that you would like to compute for first.
Example:
In this example, the operations within the parentheses will be computed first, and then the results will be divided.
Without the parentheses, the division and multiplication operations will be calculated first, followed by the addition operation, resulting in a different value.
So the following expression, which doesnt make use of parentheses, will actually have a different outcome even though it uses the same values:
Assignment Operators
Lets take a look at the Assignment operator first. The Assignment operator is represented by the equals sign (=). It can be used to assign a value to an operand.
Example:
In this example, the Assignment operator is used to assign a value of 10 to the nScore variable. The operand to the right of the equals sign is assigned to the operand to the left of the equals sign.
The other assignment operators (Addition Assignment, Subtraction Assignment, Multiplication Assignment, and Division Assignment) allow you to write shorthand versions of arithmetic and assignment operations combined.
Example:
In this example, nScore += 5 is just the shorthand version of writing nScore = nScore + 5. This means that you are adding 5 to whatever the current value of nScore is.
Comparison Operators
Comparison operators are used to compare values. An expressions that uses comparison operators will evaluate to either true or false.
Examples:
Logical Operators
The And and Or logical operators allow you to combine two or more sets of comparison expressions.
If you use the And operator, the comparison expressions you are combining ALL have to be true in order for the entire expression to return a value of true.
Examples:
If you use the Or operator, only one of the expressions needs to be true in order to return a value of true.
Example:
The Not Operator
The Not operator expresses the opposite of a Boolean.
Example:
The value of compare is false. In the trace statement however, the variable is being negated by the Not operator, so the trace statement is actually going to output the opposite of false, which is true.
The Concatenation Operator
The Concatenation operator, which also uses the plus (+) sign, allows you to concatenate or combine String values.
Example:
In this example, the Concatenation operator combines the String values together. In between sFName and sLName are two quotation marks with nothing but a single empty space inside. This is an empty string that just adds a space in between the other two String values.
The Increment and Decrement Operators
The Increment operator increments a numeric value by one (plus 1). The Decrement operator decrements a numeric value by one (minus 1).
Example:
In this example, nScore++ is the same as writing nScore = nScore + 1 or nScore += 1.
NOTE: If you try to trace nScore++ immediately like so:
trace(++nScore);
And that concludes this lesson on expressions and operators in ActionScript 3.
Read more »
var quantity:Number = 5;
trace(quantity);
Here, the variable quantity evaluates to a value of 5.
An expression can also be made up of multiple values that are manipulated in some kind of operation. For example:
trace(10 + 5);Here, we have two values: 10 and 5. The values in this expression are referred to as operands. These operands are going to be added together, as signified by the plus symbol. The plus symbol is referred to as the operator in this expression. Operators are special characters that are used to perform operations between values or operands. And once the operation in this example is complete, the expression evaluates to a value of 15.
Lets take a look at some of the operators you can use in ActionScript 3.
Arithmetic Operators
- Plus (+)
- Minus (-)
- Multiply (*)
- Divide (/)
- Modulo (%)
Examples:
trace(10 + 5);
trace(5 - 3);
trace(2 * 2);
trace(8 / 4);
The plus, minus, multiply, and divide operators are pretty self-explanatory. As for the Modulo operator, this will return the remainder from a division operation.
Example:
trace(7 % 2);7 divided by 2 is equal to 3 remainder 1. A modulo operation will return the remainder, so 7 % 2 will return 1.
When performing an arithmetic operation on expressions that have more than two different operators, use parentheses to group the operands and operators that you would like to compute for first.
Example:
var nCompute:Number = (4 + 20) / (3 * 2);
trace(nCompute);
In this example, the operations within the parentheses will be computed first, and then the results will be divided.
Without the parentheses, the division and multiplication operations will be calculated first, followed by the addition operation, resulting in a different value.
So the following expression, which doesnt make use of parentheses, will actually have a different outcome even though it uses the same values:
var nCompute2:Number = 4 + 20 / 3 * 2;
trace(nCompute2);
Assignment Operators
- Assignment (=)
- Addition Assignment (+=)
- Subtraction Assignment (-=)
- Multiplication Assignment (*=)
- Division Assignment (/=)
Lets take a look at the Assignment operator first. The Assignment operator is represented by the equals sign (=). It can be used to assign a value to an operand.
Example:
var nScore:Number = 10;In this example, the Assignment operator is used to assign a value of 10 to the nScore variable. The operand to the right of the equals sign is assigned to the operand to the left of the equals sign.
The other assignment operators (Addition Assignment, Subtraction Assignment, Multiplication Assignment, and Division Assignment) allow you to write shorthand versions of arithmetic and assignment operations combined.
Example:
var nScore:Number = 10;
trace(nScore += 5);
// Outputs a value of 15
In this example, nScore += 5 is just the shorthand version of writing nScore = nScore + 5. This means that you are adding 5 to whatever the current value of nScore is.
Comparison Operators
- Equality (==)
- Inequality (!=)
- Greater than (>)
- Less than (<)
- Greater than or equal (>=)
- Less than or equal (<=)
Comparison operators are used to compare values. An expressions that uses comparison operators will evaluate to either true or false.
Examples:
trace(4 == 4);
// This expression tests if 4 is equal to 4.
// This evaluates to true since 4 really is equal to 4.

trace(6 != 6);
// This expression tests if 6 is NOT equal to 6.
// This evaluates to false since the two operands
// have the same value and are therefore equal.

trace(10 > 7);
// This expression tests if 10 is greater than 7.
// Since 10 really is greater than 7,
// then this expression evaluates to true.
Logical Operators
- And (&&)
- Or (||)
The And and Or logical operators allow you to combine two or more sets of comparison expressions.
If you use the And operator, the comparison expressions you are combining ALL have to be true in order for the entire expression to return a value of true.
Examples:
trace(4 == 4 && 5 == 5);
// This evaluates to true since both comparison expressions are true.
// 4 is equal to 4 AND 5 is equal to 5.

trace(4 == 4 && 5 == 6);
// This evaluates to false. Even if 4 is equal to 4,
// the second comparison expression is false;
// So the whole thing becomes false.
If you use the Or operator, only one of the expressions needs to be true in order to return a value of true.
Example:
trace(4 == 4 || 5 == 6);
// This still evaluates to true.
// Even if the second comparison expression is false,
// the first one is still true, so the whole expression
// evaluates to true.
The Not Operator
- Not (!)
The Not operator expresses the opposite of a Boolean.
Example:
var compare:Boolean = 10 < 5;
// This evaluates to false since 10 is, in fact,
// not less than 5.

trace(!compare);
// This will output true.
The value of compare is false. In the trace statement however, the variable is being negated by the Not operator, so the trace statement is actually going to output the opposite of false, which is true.
The Concatenation Operator
The Concatenation operator, which also uses the plus (+) sign, allows you to concatenate or combine String values.
Example:
var sFName:String = "John";
var sLName:String = "Doe";
trace(sFName + " " + sLName);
// This outputs John Doe
In this example, the Concatenation operator combines the String values together. In between sFName and sLName are two quotation marks with nothing but a single empty space inside. This is an empty string that just adds a space in between the other two String values.
The Increment and Decrement Operators
- Increment (++)
- Decrement (--)
The Increment operator increments a numeric value by one (plus 1). The Decrement operator decrements a numeric value by one (minus 1).
Example:
var nScore:Number = 10;
nScore++;
trace(nScore);
// Outputs 11 (10 + 1)
In this example, nScore++ is the same as writing nScore = nScore + 1 or nScore += 1.
NOTE: If you try to trace nScore++ immediately like so:
var nScore:Number = 10;
trace(nScore++);
This will still output a value of 10. When using the increment and decrement operators, the variable will be traced first, so the original value will come out. Only after that will it be incremented or decremented. To avoid that, you can put the operator before the variable like so:trace(++nScore);
And that concludes this lesson on expressions and operators in ActionScript 3.
Piranha Business Tab 7 0 Zeus White Official ROM
Piranha Business Tab 7.0 Zeus White

download the 4.1 Jellybean .
Flash 8 Frame by Frame Animation and Flash 8 Onion Skin Feature Video Tutorial Series
NOTE: If you are looking for a version of this tutorial for Flash CS5, then check out Creating a Frame by Frame Animation - Flash CS5 Video Tutorials for Beginners.
In this set of Macromedia Flash tutorial online video training clips, well show you the basics of creating a simple frame by frame animation in Macromedia Flash 8. In these tutorials, youll learn how to insert blank keyframes, draw using the brush tool, and youll also learn how to use the helpful Flash 8 onion skin feature, which is a very useful tool when doing frame by frame animation in Flash 8. Well also be explaining what the FLA and SWF file formats are.
Macromedia Flash 8 lets you easily create your own frame-by-frame animation. In this video, we explain how a frame by frame animation works and we show you a simple example of a Flash 8 stickman animation.
[ALTERNATE LINK]
In part 2 of the Flash Frame-By-Frame Animation Tutorial for beginners series, we show you how to draw a simple stickman on the stage of your Flash document.
[ALTERNATE LINK]
In Part 3 of this Flash 8 video training series, well teach you how to add keyframes and how to use the Flash 8 Onion Skin feature - a feature that lets you see a tracing guide based on the objects in previous or next keyframes.
[ALTERNATE LINK]
Make it a habit to save your work often! It can save you from the frustration of losing all of your hard work.
[ALTERNATE LINK]
In Part 5 of the Flash Frame-By-Frame Animation video tutorial series, well show you how to preview your animation. This video also explains what a SWF file is.
[ALTERNATE LINK]
In the final part of the Flash Frame-By-Frame Animation Tutorial series, well show you how you can adjust the frame rate of your animation.
[ALTERNATE LINK]
Read more »
In this set of Macromedia Flash tutorial online video training clips, well show you the basics of creating a simple frame by frame animation in Macromedia Flash 8. In these tutorials, youll learn how to insert blank keyframes, draw using the brush tool, and youll also learn how to use the helpful Flash 8 onion skin feature, which is a very useful tool when doing frame by frame animation in Flash 8. Well also be explaining what the FLA and SWF file formats are.
Part 1: Flash 8 Frame-By-Frame Animation Tutorial - Introduction
Macromedia Flash 8 lets you easily create your own frame-by-frame animation. In this video, we explain how a frame by frame animation works and we show you a simple example of a Flash 8 stickman animation.
[ALTERNATE LINK]
Part 2: Flash 8 Frame-By-Frame Animation Tutorial - Drawing on the Stage
In part 2 of the Flash Frame-By-Frame Animation Tutorial for beginners series, we show you how to draw a simple stickman on the stage of your Flash document.
[ALTERNATE LINK]
Part 3: Flash 8 Frame-By-Frame Animation Tutorial - Adding Keyframes and the Onion Skin Feature
In Part 3 of this Flash 8 video training series, well teach you how to add keyframes and how to use the Flash 8 Onion Skin feature - a feature that lets you see a tracing guide based on the objects in previous or next keyframes.
[ALTERNATE LINK]
Part 4: Flash 8 Frame-By-Frame Animation Tutorial - Saving Your Document
Make it a habit to save your work often! It can save you from the frustration of losing all of your hard work.
[ALTERNATE LINK]
Part 5: Flash 8 Frame-By-Frame Animation Tutorial - Previewing Your Animation
In Part 5 of the Flash Frame-By-Frame Animation video tutorial series, well show you how to preview your animation. This video also explains what a SWF file is.
[ALTERNATE LINK]
Part 6: Flash 8 Frame-By-Frame Animation Tutorial - Adjusting the Frame Rate
In the final part of the Flash Frame-By-Frame Animation Tutorial series, well show you how you can adjust the frame rate of your animation.
[ALTERNATE LINK]
Subscribe to:
Posts (Atom)